C# The Definitive Guide
Part 1: Beginner C#
In this post you will learn the basics of C# such as:
- installing Visual Studio IDE
- learning about the different types of Visual Studio projects
- understanding the basic programming principles
- learning about unit test projects
- starting to dig into math operations with C#


Getting Started
Chapter 1
How to Download and Install Visual Studio
In order to get you all set up so that you’re ready to do the work in this class. You’re going to need the Microsoft Visual Studio IDE. You can get it by going to VisualStudio.com and it is entirely free if you’re a student or just an independent developer who’s learning.

So, on the Visual Studio website, you’ll see here where it says Visual Studio IDE and when you put your mouse over the download for Windows, you have a couple of different options.
The Community 2017 is the version that you want to download for this course. One because it’s free and mostly because there are a lot of other features in the professional and enterprise versions that you simply aren’t going to need.
So, you can click on Community 2017 to get your download started. If you want to learn more about the Visual Studio IDE environment, you can click on that link there and you can see that there’s a Windows as well as a Mac OS version that’s available.
There’s a lot of information in here just about the IDE which we’re going to get into once you have it installed.
I’m going to give you a little bit of a walkthrough on some of the different things that the software can do. Make sure that you understand how to get started with the projects that we’ll be working on in this course.
One of the things that I want to point out here is called workloads.
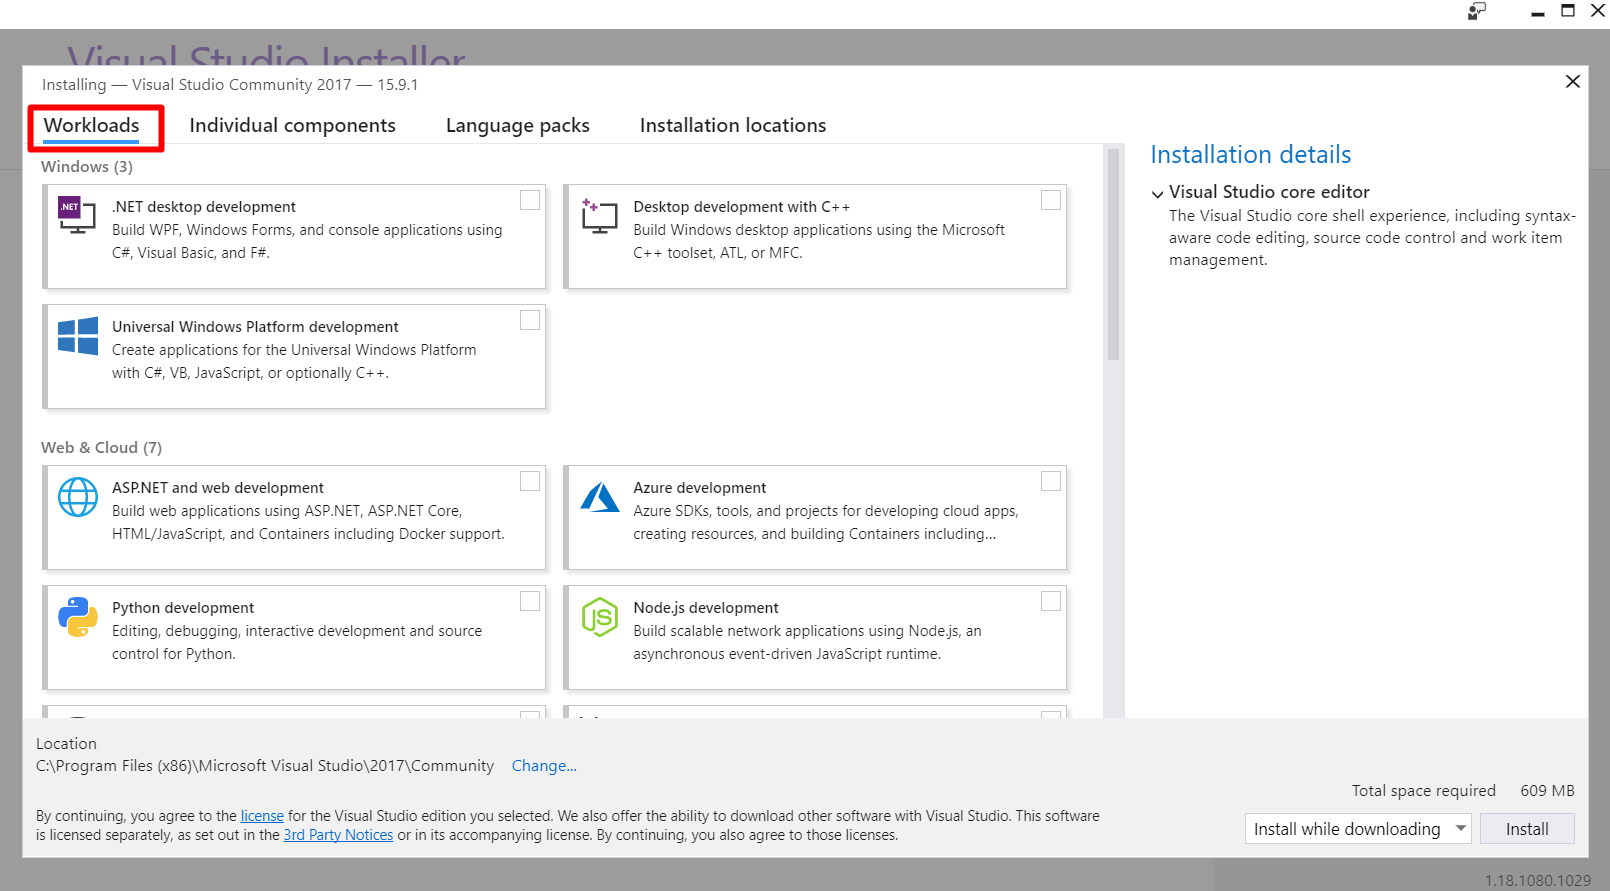
In the past we used to have to download gigabytes worth of the Visual Studio IDE, had all of these component packs and tool sets and things and if you didn’t need them they just took up a bunch of space on your hard drive.
What Microsoft has tried to do here is create in this workloads program a very lightweight installation process that only gets you what you need for the development that you plan on doing.
So, you can see that there’s a lot of different environments depending on maybe what you’re doing, web development or mobile development.
You can build extensions directly for the IDE in Visual Studio, so we’re only going to be focusing on the.NET desktop development side of things.
If you click on that, you can get kind of some more information about what that means, what some of the workflow items that you’ll get in Visual Studio are about.
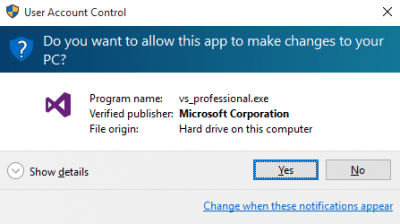
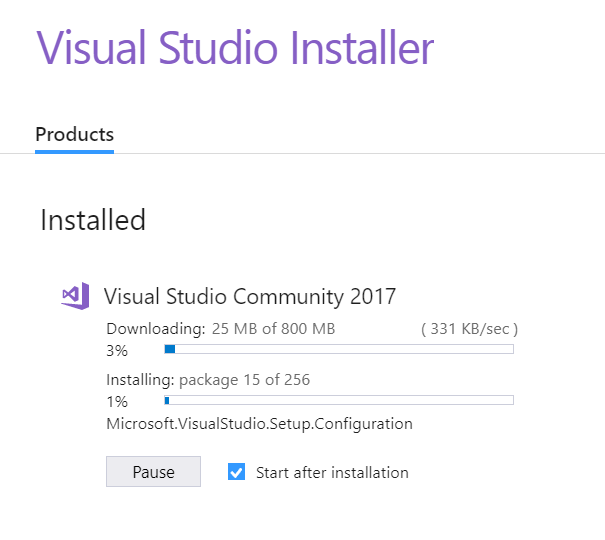
So, if you hadn’t went ahead and clicked on that downloader for the Community Edition, you’ll want to go ahead and do that and start that installer.
So, if you have user account control turned on, like I do, in our Windows 10 installation, then you’ll get this little box. It says “Do you want this to make some changes to your hard drive?”. We’re going to go ahead and say “Yes”.
During this step, this is where you’re going to be able to make some changes or tell visual studios installer what it is that we’re going to be doing and that way we don’t end up with a bunch of extra components we don’t need.
Now, this is the step where the majority of the download happens. Because when you just click that little downloader, and it probably downloaded really quickly, all it was is just the basic installer.
So, the Visual Studio installer is going to pull down some files and things that it needs just to do the core portion of the installation.
Here are the workloads that we can select inside of the Installer, we’re not going to be doing any windows platform development or we don’t need the C++ components. We only need the .NET desktop development components in here.
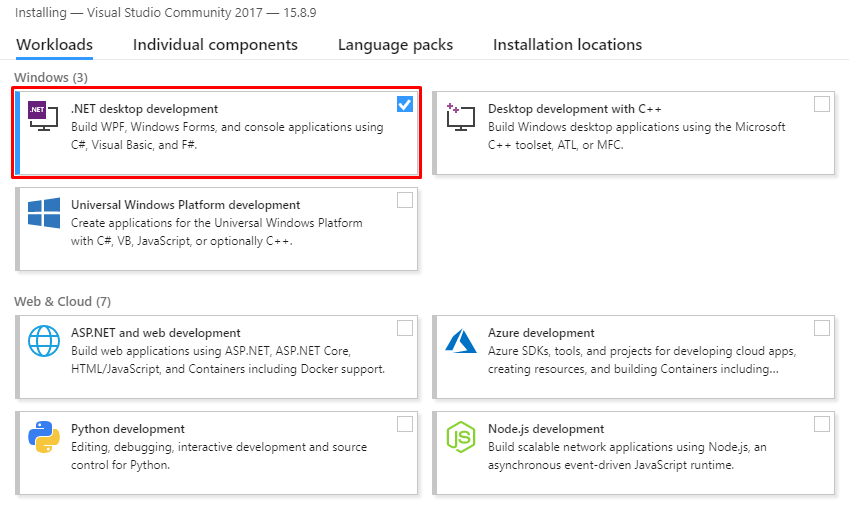
We can click on that!
You can see that you get a bunch of optional things over here on the side. If you knew that you were going to be using maybe a Sequel Server Express or something in your development then you could select any extra things over here that you might need.
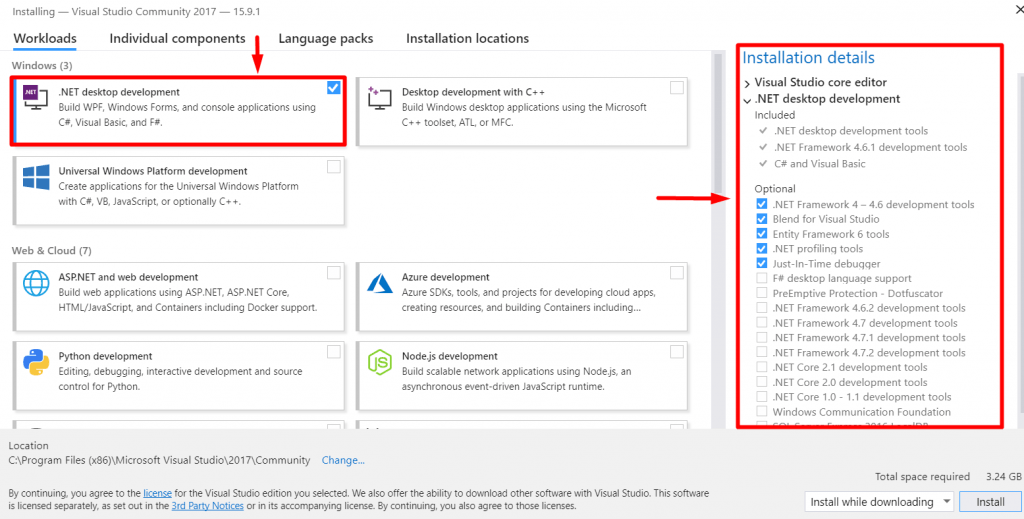
Then, of course, the installer is going to tell you where it’s going to install it, so maybe you keep things on a separate drive or something like that. You’ll want to make changes to that and it’ll tell you the total size of the components that you’ve selected.
As you can see, there’s a lot of stuff in here that you may or may not be familiar with. Depending on what it is that you’re going to be doing, then you would select all of the things that apply and of course it would update this information to say how many gigabytes this installation is going to take.
Once you click install, it’s going to go ahead and start the process of downloading any components that aren’t already on your hard drive and getting you set up.
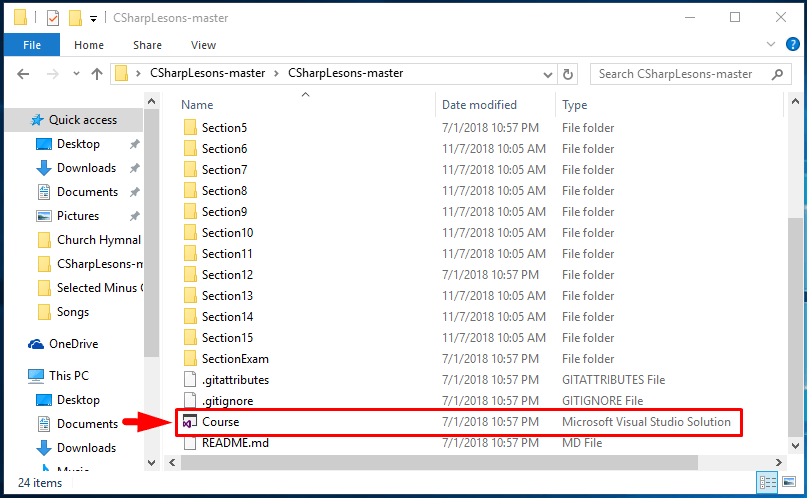
Downloading Course Solution
So, to get started in this course you’re going to need to get the URL for our repository and so you can get that from the github link.
This repository contains the solution and all of the code for all of the items that you’ll see throughout this course.
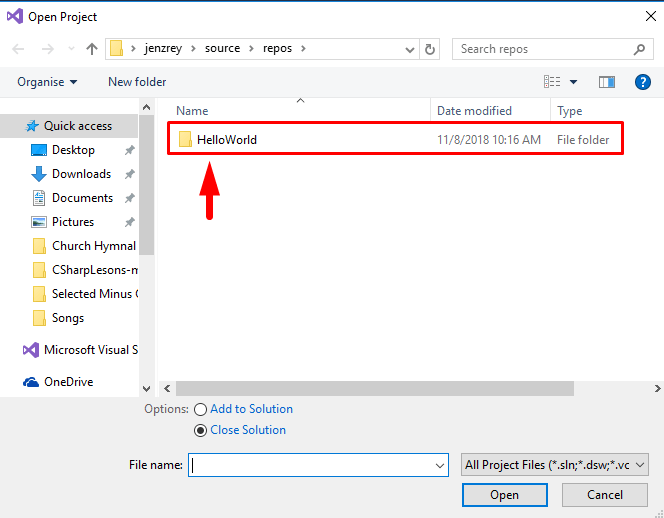
If you’re not familiar with github from this page, you can click this green clone or download button and then we want to download as zip, right here, Download ZIP.
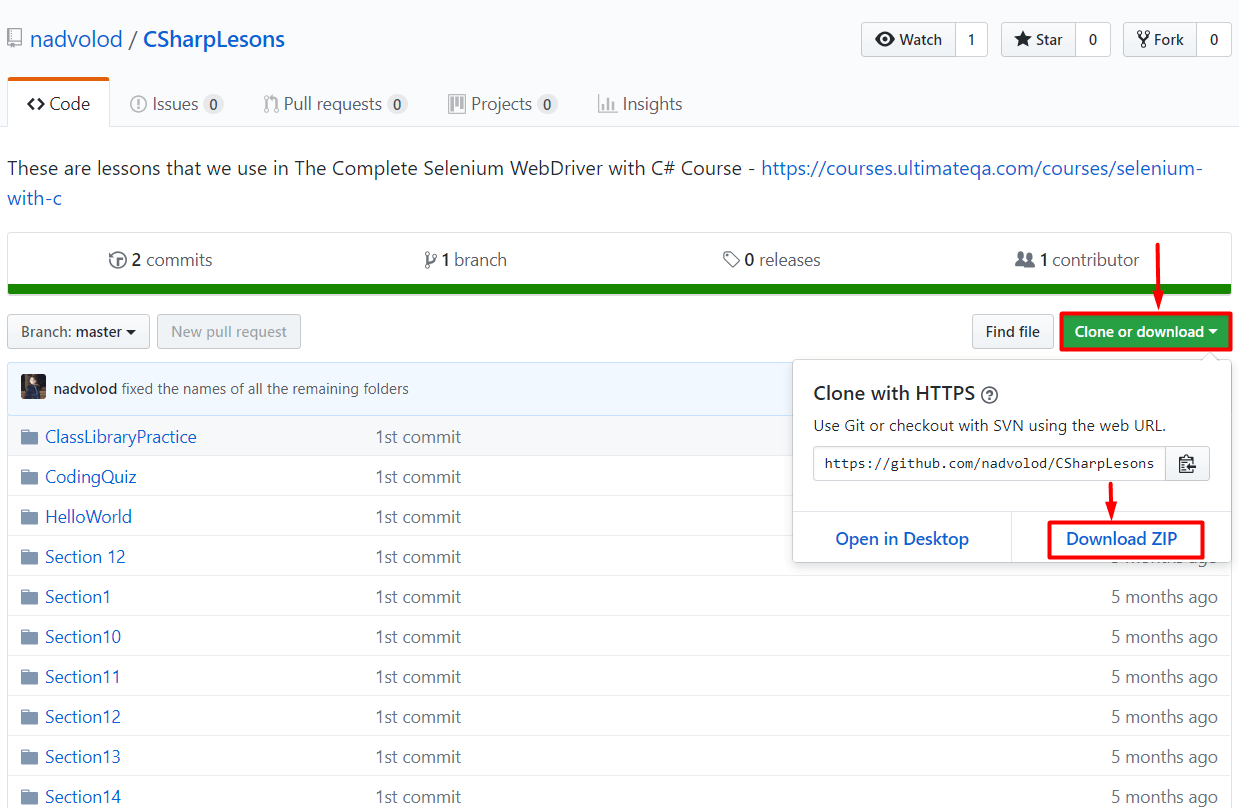
That’s going to download all of these files so that you can open them in Visual Studio once you have that installed, if you’ve not done that already.
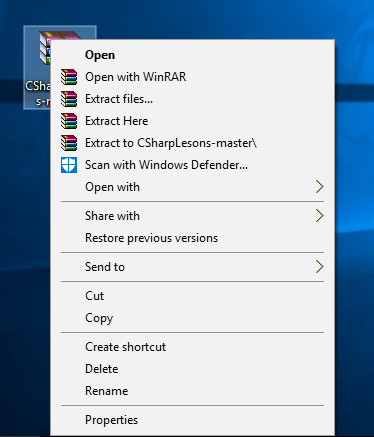
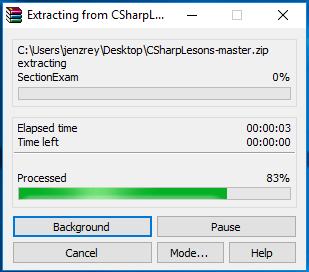
So, it shouldn’t take you very long to get that downloaded. You’ll want to unzip. So, usually that’s just as easy as right-clicking and choosing Extract All. Then, it’ll ask you where you want to put it I usually just click Next and take the defaults.
Then, once you have it unzipped, you’ll see that there are a lot of different folders inside of here. You want to go straight to this one named Course.sln, the solution file. When you double click that, it’s going to open visual studio and get you started.
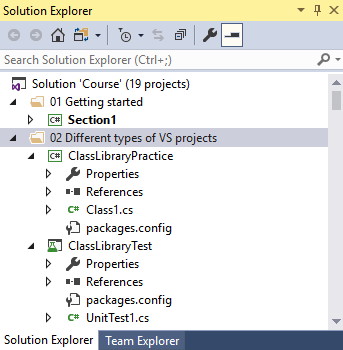
Looking at this open solution here, in our Solution Explorer, as you move through the course, each section is lined out here in a folder.
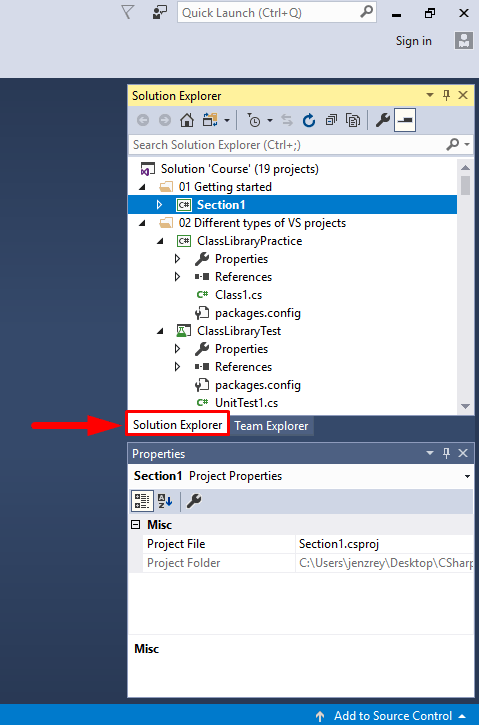
So, as you move through “Section 1”, you can open this up, see the project that is inside and view any code files that are in there.
As you move through each section of the course, you’ll just want to open up that section and review any of the files that are inside.
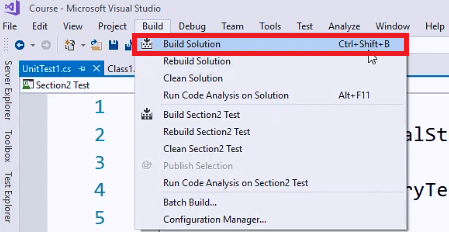
One of the first things that you’ll want to do is build the solution to make sure that there weren’t any errors and there’s nothing wrong with it now that you have it.
So, you can come up to the Build menu, Build Solution, we also see that that’s “Ctrl + Shift + B” if you’re trying to get used to using some hotkeys.
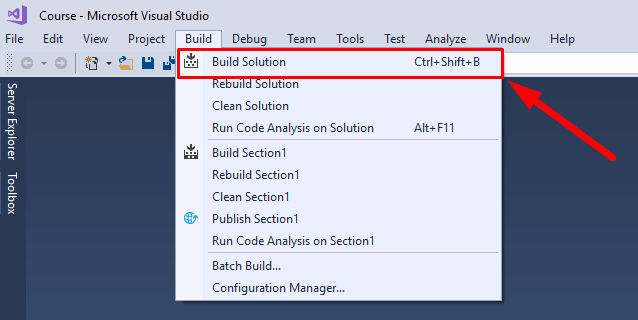
Down here in the Output section, it will start that build and give you the output.
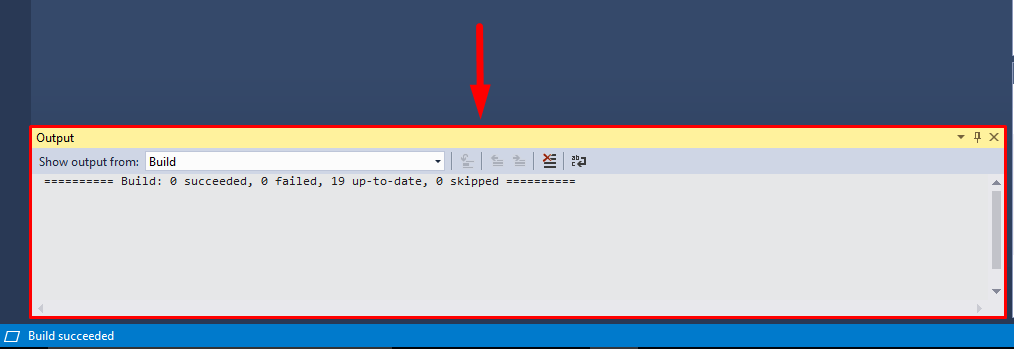
Now we should just see everything succeeded or is up to date based on how many times you’ve built it.
If there were any errors, you’d see them here in the error list but there was nothing that failed so everything is all good.
You’re ready to go! So, let’s get started and moving forward with our course.
Creating Your First Project
So, now that you have Visual Studio installed. Let’s just get it open and take a little tour.
If you’re not familiar with the software, it can be very intimidating because there’s just a lot of windows, a lot of buttons and a lot of stuff going on in here.
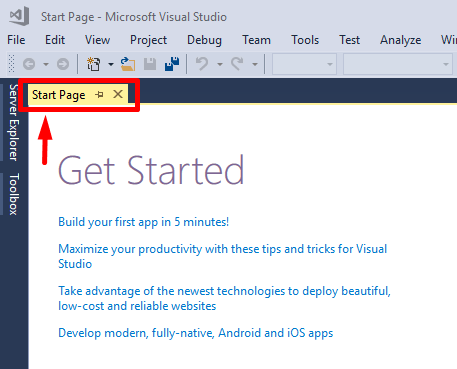
So, to get started, when you first open Visual Studio. You get this Start Page which is up here in this tab. This is what we’re looking at, kind of gives you some links, it’ll show you recent projects. Of course I have some open but you haven’t opened any, so it’ll be nice and blank for you.
Just to kind of give you an overview, we’re going to start our first project and kind of walk through what that looks like.
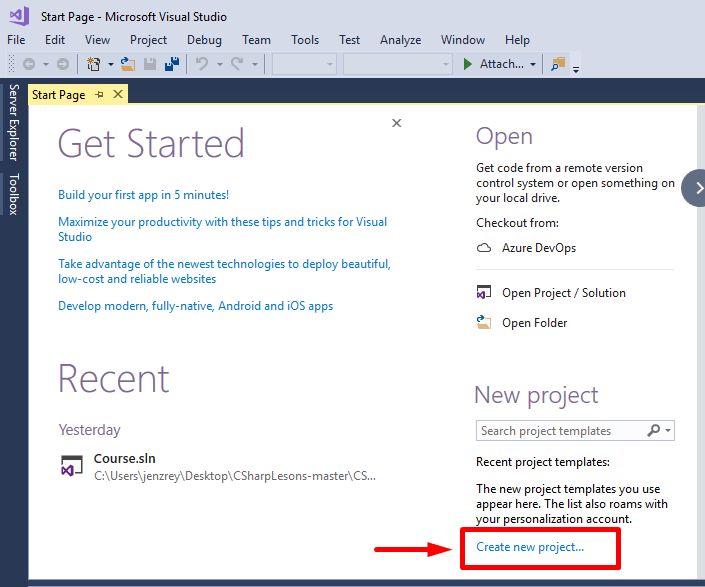
So, to start a new project you can come to this link that’s right here. It says Create new project…, under this New project section of the Start page.
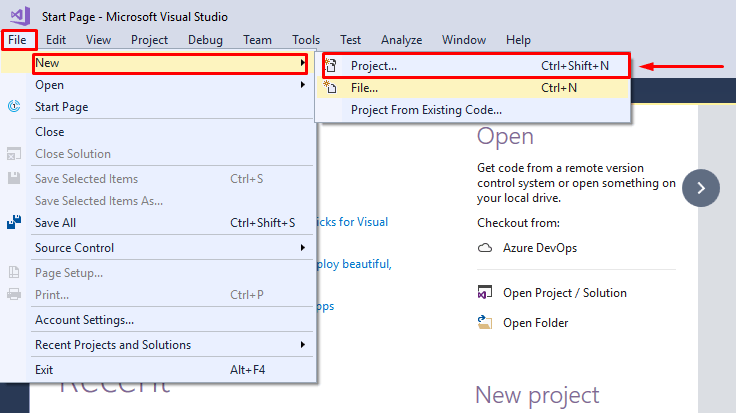
We can also come up to File and New, Project…, and select it from there.
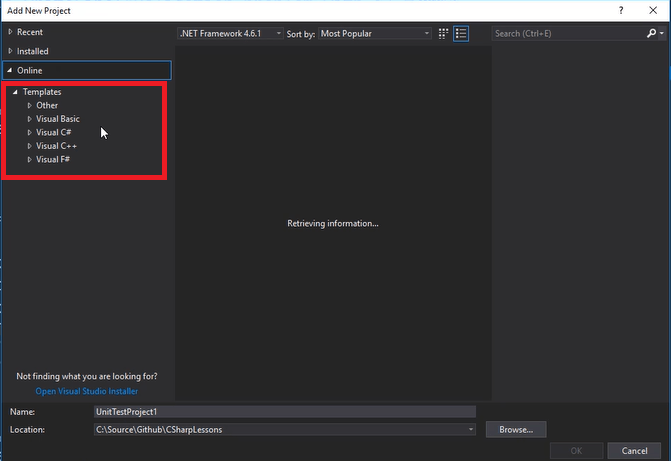
But, whichever way you do it, you’re going to get this New Project window. The New Project window, like most things in Visual Studio, can get a little busy.
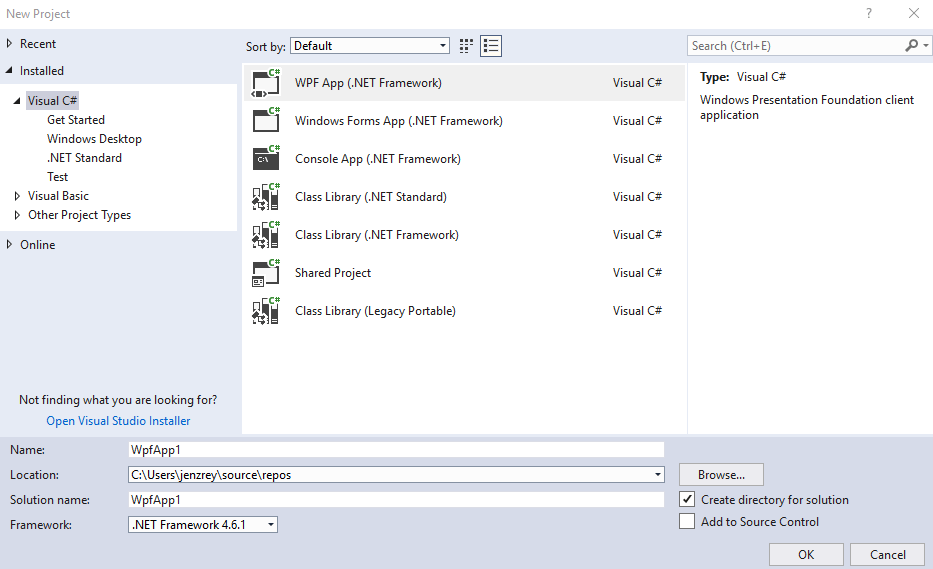
Over here on the side, we can see that we have a bunch of different templates and the templates are simply the types of projects that we want to build.
We can see over here we have things like Windows Forms applications, Console applications, Class Libraries.
If you have other languages, maybe you decided to install some of those other building blocks from the workflows in the installation section. You would have a bunch of different templates installed.
So, just to get us started, we’re going to start with a Console application. We’re going to look at some of the different types of projects available.
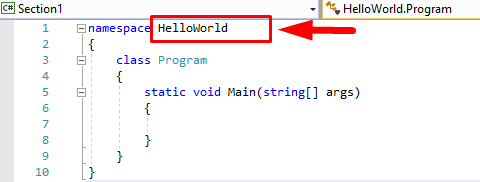
But, when we select Console App, it’s going to let us give it a name here by default it gives us “ConsoleApp1″. But, I’m going to name this just kind of like a “HelloWorld”, right?
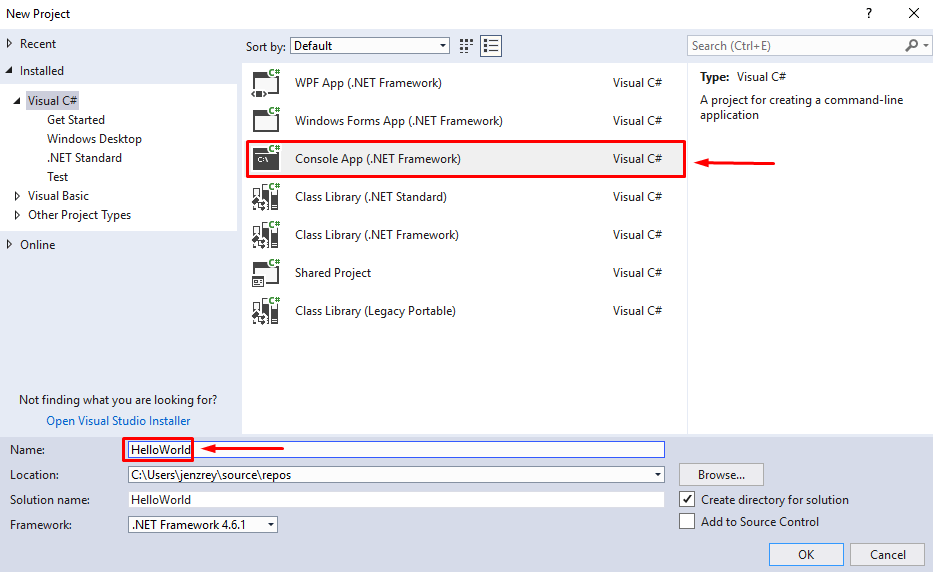
Traditionally, that’s what we call our first application. It’s going to tell you where the project is going to be saved and by default there’s in your documents of your home directory Visual Studio 2017 projects.
Don’t worry about the rest of these check boxes down here.

It’s going to create a directory for the solution as long as we leave this checked. Then we won’t be looking at source control, so don’t worry about that.
Once you’ve got it named, go ahead and click OK and it will get that created. It will kind of take us right into the first document and so just to give you an overview of some of these different windows that we have.
So, to start with, it opens Program.cs which we can see some code and things inside of here. This is where the majority of our code editing happens.
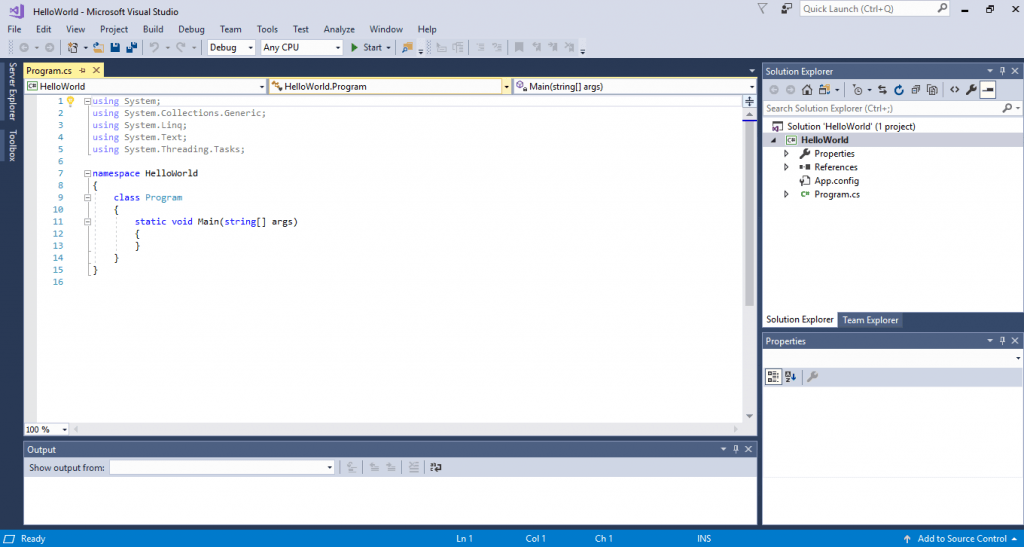
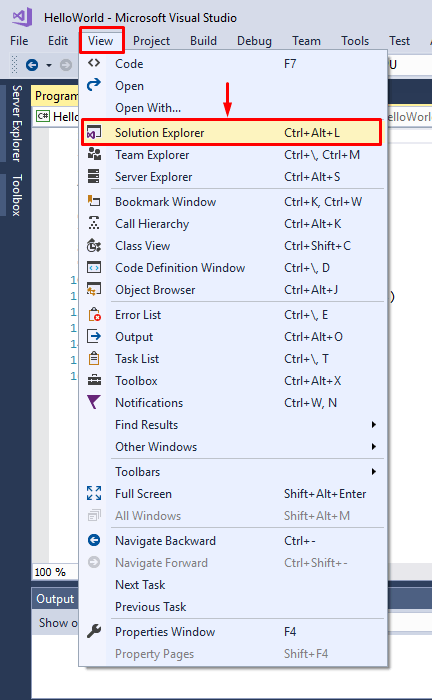
Now, over here on the side, if you don’t have your Solution Explorer window open. You can open it by coming up to the View and then it’s right here Solution Explorer.

Now a solution is a container, it doesn’t contain any code itself but it contains a bunch of information about the files and the structure of our application.
You can see that the Solution Explorer kind of gives us a hierarchy relationship. By the way these things are displayed.
So, our solution, which is named what we named our project “HelloWorld”, contains inside of it a project named “HelloWorld”. A project allows us to have a bunch of different files that all serve some kind of purpose.
So, we said this was a Console project so that’s different from like a Windows Forms project. We have properties and some built in information that we can look at in here. If you ever wanted to come in and view all of the properties we can dig into some of that later.
References, our other libraries and things in the .NET system that we are connecting to.
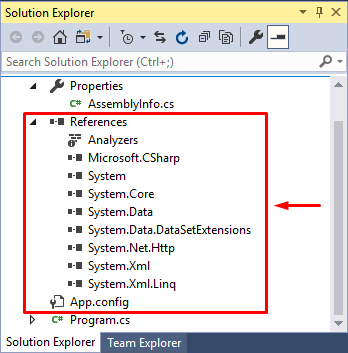
And, then, Program.cs. This is our main file here that makes up our program.
That’s kind of an overview of some of the different windows and things that you might have in a Console application. When we start a console project.
If we are creating a different kind of project, we might have different things over here in the solution. Then, of course, Windows Forms have that GUI component, the visual side of the application that presents itself with the code on the back end. So, we’ll look at what one of those projects looks like as well.
Then, the important part becomes, once you’ve opened a project how do you close it?
Well, you can come up to the File menu and you can Close Solution.
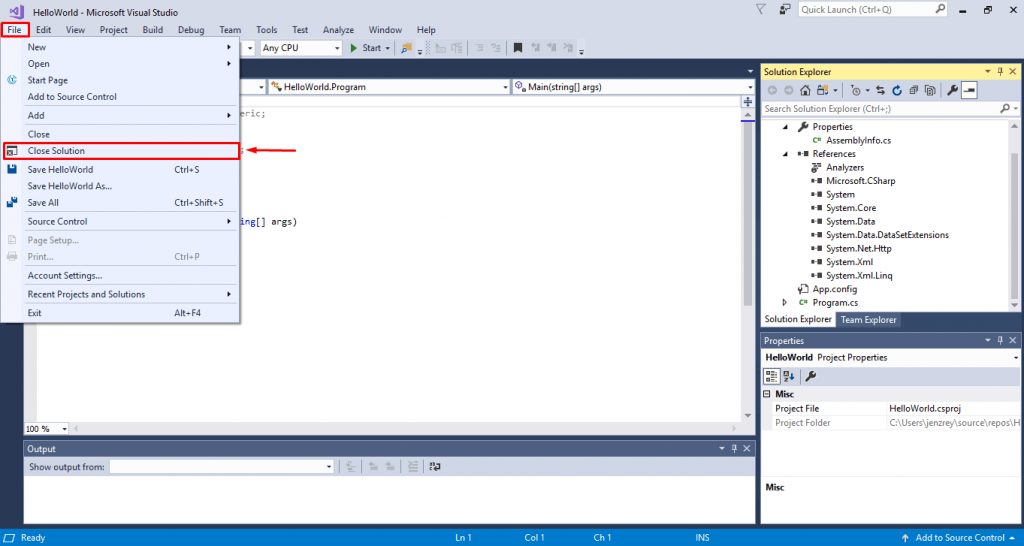
That will close us out of our files and take us back to the Start Page.
Important Menus in Visual Studio
Ok! So, I know in that last section I just kind of blew right through some stuff.
Let’s take our time for a moment and dig into some of these menus and things that we’re looking at. We can see on our recent window in Visual Studio that “HelloWorld” solution that I just created.
So, any time you want to open a project that you’ve previously been working on. If it’s not in your recent list, you can come up here to File, Open and Project/Solution.
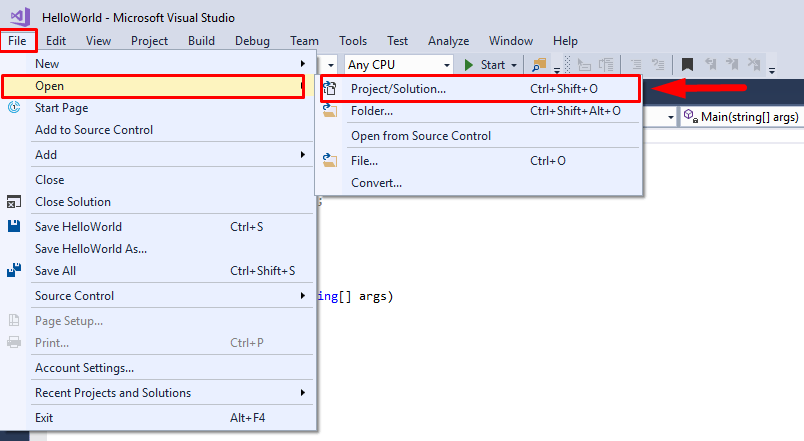
You can go find it on your hard drive.
Of course, if you have the project available you know where it is. In this case, it’s in My Documents, Visual Studio 2017, Projects. There’s my “HelloWorld” folder. There’s that solution that .sln file and if I double click that then Visual Studio will go ahead and open and launch my project for me.
There’s a lot of different ways that you can open up a previously used project if you want to pick up where you left off.
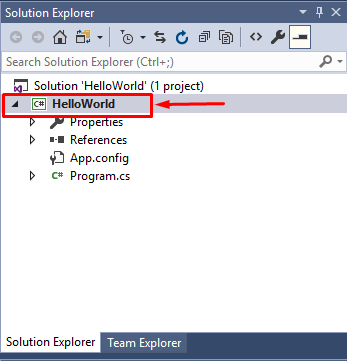
So in this “HelloWorld” application that we’re looking at, there’s a couple of important things that I want you to know how to find. The first one I showed you was the solution explorer.
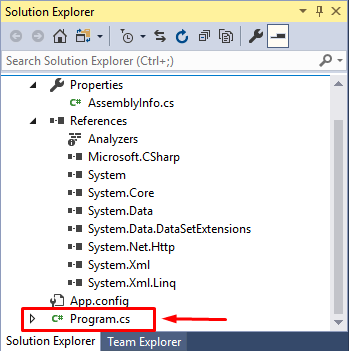
Now, if you should close your Program.cs file. So, if it goes away entirely, we can just doubleclick it from the solution explorer and open it right back up where we left off.
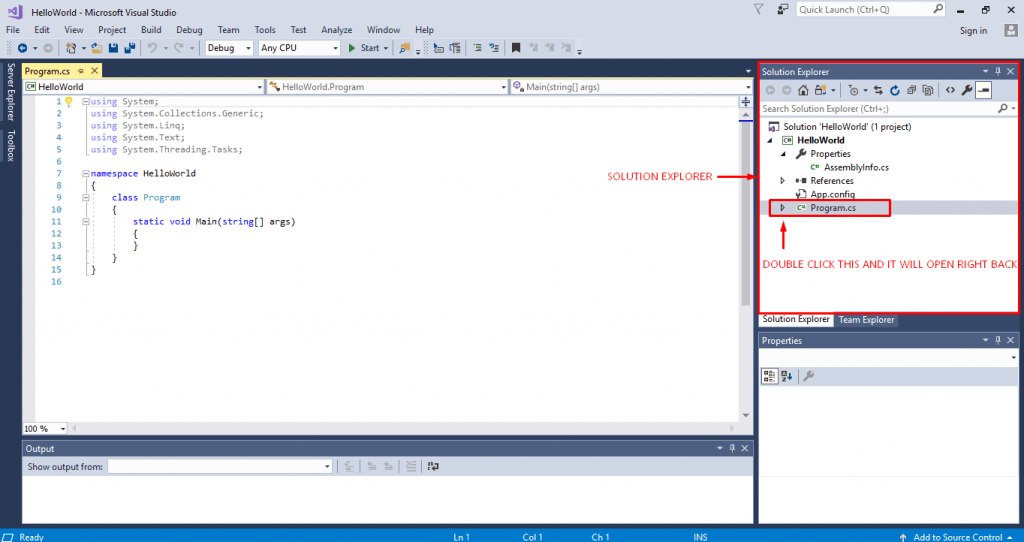
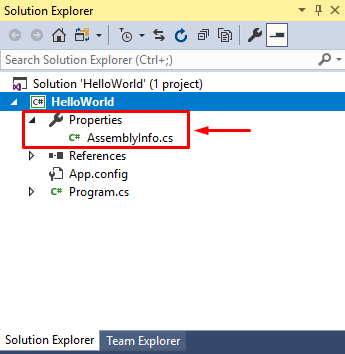
As we start to get into bigger applications that maybe have more than one .cs file inside of them. You’ll always find them over here in your Solution Explorer. Again if you lose it or if you lose any windows you can find them under the View menu. So here we can see the Solution Explorer is right there.
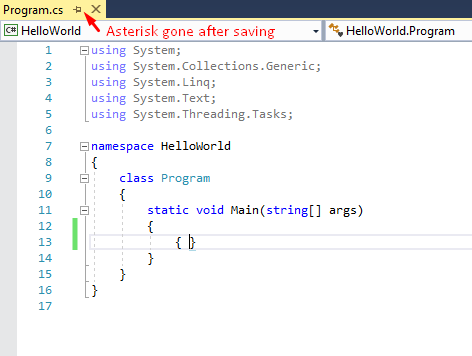
The other important things of course we have are like Save. If we make an edit to a program there should be an asterisk appear on the tab on the name of the file. So we can see that it hasn’t been saved. But once you save it that asterisk will go away.
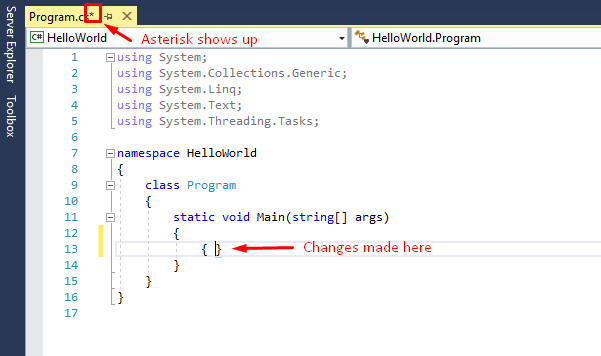
So if I make a change, we saw that asterisk pop up. Then if I save. it goes away.
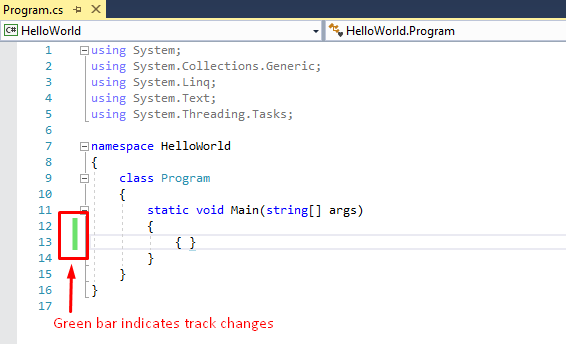
I also have version tracking on, so I should see the bar over here on the side. If you don’t have the little green bar, don’t worry about it. I keep tracking on so I can keep track of my changes.
Just kind of like in a word document when you have tracking changes on appear on the toolbar.
We also have a couple of important buttons. So we have a Debug and Release version of our application. The difference is if we’re in debug mode and the application should crash, hang or do something unexpected, we’re going to be able to get information about that and do some debugging on it.
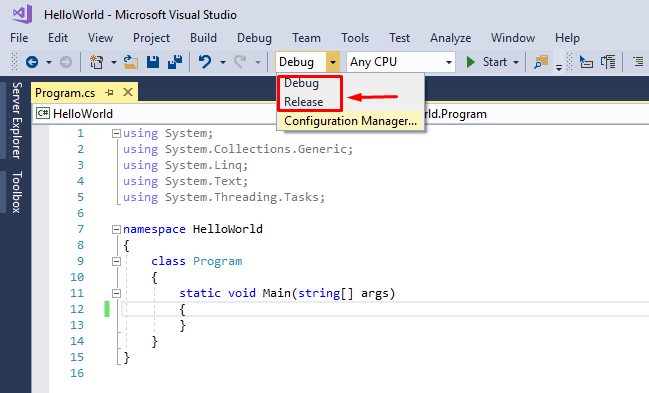
If we’re in release, the application is just going to crash and we won’t get the information that we need to fix it. So we want to keep in debug mode.
If you have multiple CPUs or multiple cores on your system, you can actually configure Visual Studio to use certain ones. But of course we just want to use any.
Then, the big Start button. This is the important one. When we run our application we push Start.

Right now, since there’s no code in my program, if I push Start what Visual Studio is going to do is initiate a build.
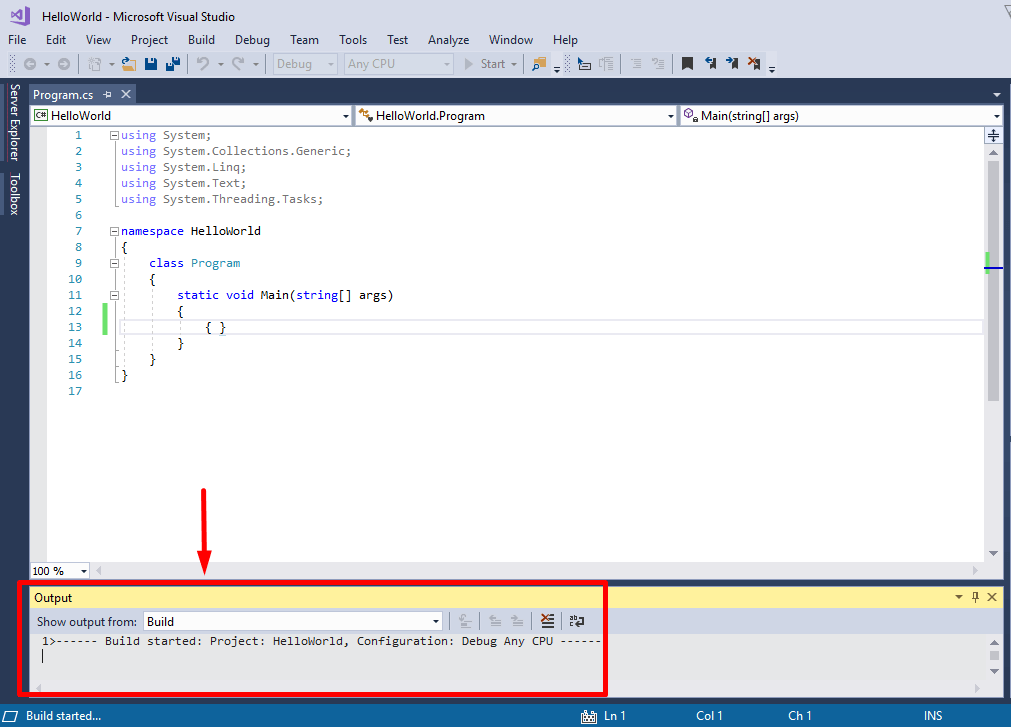
Down here we get this output window that opens up for us. There you saw real quick the console window opened because this is a console application. Nothing happened and it immediately closed.

That output window, as well as the error list, reside down here at the bottom. When we click on them we can open them. And, if you want to make them stay, you can hit the pin so that they stay docked down here.
Now in the output window, we can get kind of a running stream of consciousness from Visual Studio about everything that’s happening in the system. What did we launch, what happened. We can see that “HelloWorld.exe” ran and exited with a code of 0, which is “Hey everything’s fine”.
If we had errors in our program, we would see them here in the error list and it would give us an overview of the number of errors, warnings or messages that we might have in our program. As we dig more into debugging you’ll be able to see this a little more in action.
Along with debugging, we have a debug menu which allows us to say if we want to start our application with debugging or without which we almost always want debugging.

Then, over here on the test menu, once we start getting into writing some different types of tests and doing testing on our applications, this is where we can have some multiple options and you’ll find those under the test menu.

That’s really all that you need to get started!
Being able to create the type of application that you want, get into your code, write the code and press Start. See any errors, that’s really the basics.
Don’t let all of these different buttons, menus and things in Visual Studio overwhelm you.
We’ll kind of take it step by step and introduce new things as they’re needed.
Solution Overview
Okay! So, let’s talk a little bit about that file I talked about called a solution.
The solution is just a structure for organizing your projects. Inside of Visual Studio the solution helps us maintain all of the state information that we might need about a project. Like I showed you in in the last section, that’s a .sln file right for solution.
We also get a .suo for things like user specific solution options. So, if you went into the properties and change some things then that would show up in the suo file. But, we’re primarily worried about this .sln. What is a solution?
So, you can kind of think of it like this, like a solution is a big container. Inside of that container we can have all of the items that we need to run any project that we might have.
In fact, inside of the solution could be a project itself and the solution could actually contain many of these different projects which is something that happens. When we get larger solutions, we have larger projects, we might have multiple projects inside of one solution.
So, we might have a project in here that is the main code. We might have a test project that contains all of our unit test items. We might have images or icons, maybe music files like mp3 or mp4 files that are used inside of your application.
We have config data, we have the solution user option data, right? Everything inside goes on inside of this solution.
As we create these projects, the solution is ultimately the top of that hierarchy.
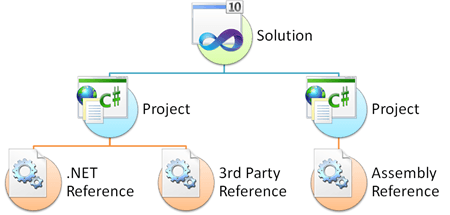
Image by AIT GmbH & Co. KG
If we remember what we looked at inside of that solution Explorer.
We had that solution on top, underneath we had the project, whatever we named it. Underneath that, files like the .cs which contained the actual source code. Configuration information, we have those references, right?
So, all of that stuff belongs in there and so if we end up with a second project, then we would actually have two of these items under the one solution.
I just wanted you to kind of wrap your brain around that a little bit. The solution itself, you can actually open that .sln file and see what goes on inside. It’s just a bunch of kind of variables and state data. It doesn’t actually contain any source code, we never go in there and put anything in there. Everything is managed by Visual Studio.
So, I just kind of wanted you to understand what it is and the purpose and what it does so that you know why we’re doing this. As we move into larger projects it will start to make a little more sense why we have this different kind of hierarchy with these multiple projects, what goes on inside of here.
Then, ultimately, if you’re going to go open a previous project that you’d been working on, I showed you how to find that .sln file on your hard drive so that you can open that and and get what you need to do inside of Visual Studio.
I hope this isn’t too confusing but I just wanted to address it so that it’s not confusing and you understand why we’re doing what we’re doing.
Solution Architecture
Now that you understand a little bit more about what a solution is, its role in Visual Studio and, your project management. Let’s just talk for a second about some best practices!
Microsoft’s best practices state that we should separate out our items inside of the solution into four categories. It’s either part of the business logic layer, data layer, presentation layer or services layer.
Inside of our solution, we can actually create folders that allow us to sort all of the items and full end folders and files and everything that we have.
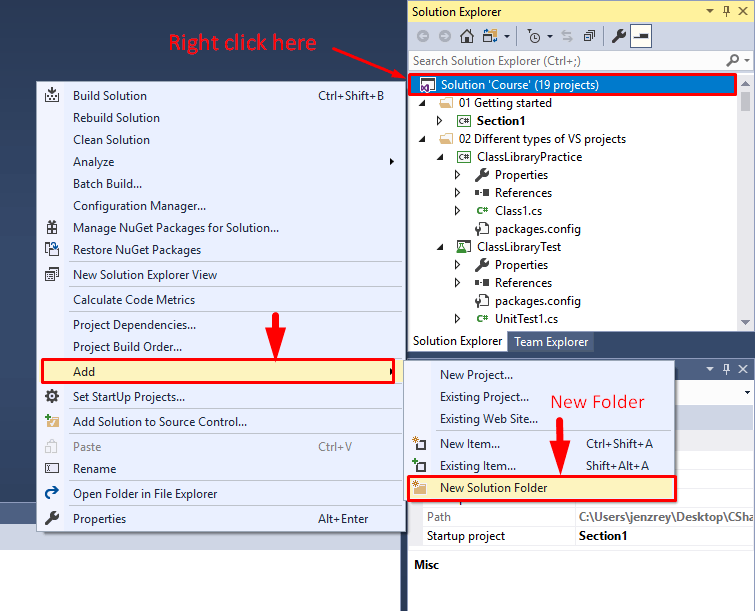
So, just to show you how this works, we can come into our project and we can right-click, add a new folder and that will let us create folders inside of a particular project.
If I wanted to separate out, you know, business logic. I could create a folder in here, I could add another folder for that presentation and so this is where things like GUI objects and, maybe, images, icons and things that I would be using would go inside of there.
Then, I could add a folder for that data layer or just data. If I had maybe classes that were facilitating my connection to a database or something, we could put those in there. Those four layers are really what Microsoft considers best practice but it can get much more in-depth.
If you’re not familiar with Stack Overflow. I strongly recommend that you get acquainted with this website. As they are kind of the pinnacle of all knowledge about not just software development, but this is the main place where software developers go to ask questions and to get the answers to questions.
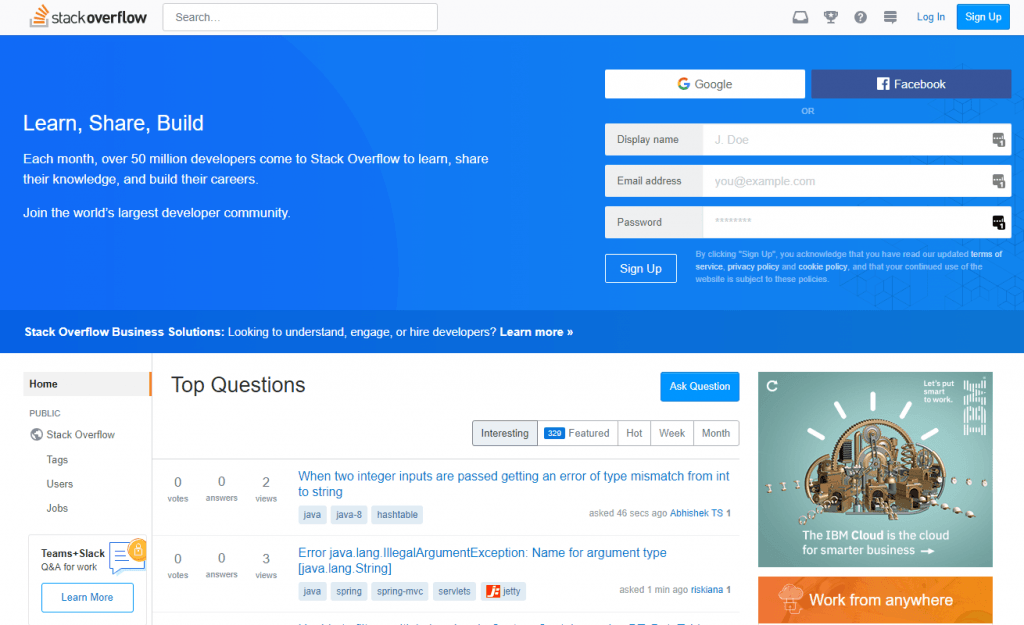
So, there is a very popular post on Stack Overflow called the Ultimate Visual Studio solution structure which is a very in-depth look at how we should structure our solutions when they start to get very large.
You can see in here that you have your solution, then whatever your project is, there’s all these folders under here that may or may not pertain to your project based on, you know, is this a Windows forum? Is this a console? Is this a website? Is this a service? What kind of project is this? But, we can see what this would look like in the actual solution Explorer.
Depending on what your project is, it can get quite complex. That’s where this organization and setting up our folders and thinking about how we’re going to structure our project really comes into play.
Then, the last thing I would want to add is just have some consistency in regards to things like naming. We typically use the camel case for naming where we have the the first letter of each word capitalized.

Image source: Wikipedia
So, if you’re not familiar with camel case that’s a good thing to use. Just makes it a little more readable. Then, just being consistent with your naming, having your files and everything organized inside of there.
It’s good to start in the way that you mean to go. I recommend that you set up some basic folders in your solution for each project that you’re working on, so that you can kind of keep up with this idea of maintaining that organization as your projects get larger.
Coding Conventions
Next we’re going to talk about C# coding conventions to make sure that we understand a little bit of some best practices. As recommended by Microsoft, there are some ways to create kind of a consistent look and feel of your code.
That will enable readers to understand the code and it won’t look, you know, kind of messy or have things out of place. it’s going to be easier to maintain.
When you get into a work environment, you’re going to be able to have kind of this cohesion between all of the people who might be working on a code base. Everyone will understand naming conventions and it’ll just make the whole process a little easier.
So, what I have up here is the Microsoft MSDN C# coding conventions guide. It was last revised in 2015, there hasn’t been a lot of changes to this guide because really as the C# language grows, the formatting standards that we’re used to using here as kind of this base document just get applied going forward. There haven’t really been any changes to how we should format the code.

The other thing I want you to think about is that most places where you work are going to have their own internal coding guidelines. What this document here is, it is basically Microsoft’s internal coding guidelines for any of their developers who are working with the .NET framework.
While it’s good to learn some best practices for getting into some good habits. Please understand that anywhere you go to work, they may have their own rules that you’ll need to learn and follow.
A lot of this style guide here goes into things like tabs versus indents, where we should put braces. Making this more block style brace versus putting your curly brace behind the parentheses, which can make for some readability issues
When to use single line statements, so putting curly braces and everything all in one line versus in a block. How we should comment, of course commenting is super important. Comments are used to describe the code so that it makes it a little more comprehensive and easier to read.
And in C#, we sometimes create these blocks of comments by using the two slashes and kind of setting up these dashes so that it’s a big block and it’s easy to see.
You can also create single line documentation comments in the code by creating these three lines using different types of almost HDML like tags to describe the code inside. It’s actually an XML doc standard that we can use for those documentation comments.
We can also use the two slashes to create single line comments inside of the code, so it’s always good to just document your code as you go.
This guide also has some things regarding naming and naming conventions. Spaces, so of course we don’t want to put a space between a name and a parentheses. The parentheses always goes right behind the name. We don’t want to put spaces inside of the parentheses as they’re outlining in here.
So, when you’re looking over these guides you’ll just want to kind of pay attention to what it is that you’re doing. Then, they have some naming conventions for things like classes and variables.
What you should and should not do, prefixing them with underscores, writing things in all caps. Usually those kinds of naming conventions help us understand what type of variable it is or is it a constant? Is it a member? Is it a property or class?
If we get into this habit of naming conventions and using these standards, then we don’t have to necessarily lean on the IDE or read back through the code to be able to understand what we’re looking at.
We talked a little bit about file organization in the section on solution architecture, but it’s just important to think about we should organize our files and keep some kind of structure so that we don’t just have a pile of different types of files in one folder.
Not saying it won’t work, but it’s incredibly hard to find what you need and think about the organizational structure of your project if it’s not well done.
So, I would recommend that you look over any of these kinds of C# coding convention documents. Either this one that was published, you know, kind of helping developers like yourself get on the right path.
Or looking at Microsoft’s internal coding guidelines to kind of get an idea of “Ok, what do Microsoft’s own developers do?”.

Then, thinking about, you know, “What makes the code more readable? What facilitates it to make it an easier experience for other people who might come in and read this code later? Or even just yourself six months, one year, down the road?”.
Coming back to projects you haven’t worked on in a while and being able to read your own code is super important.
Remember that you kind of take these things with a grain of salt. The IDE is not going to care if you’re following conventions because they’re not directives, they’re not syntax errors, if you don’t do these things.
But, we just want to think about them for the purposes of having a consistent look and feel and an overall readable code base.
Types of Visual Studio Projects
Chapter 2
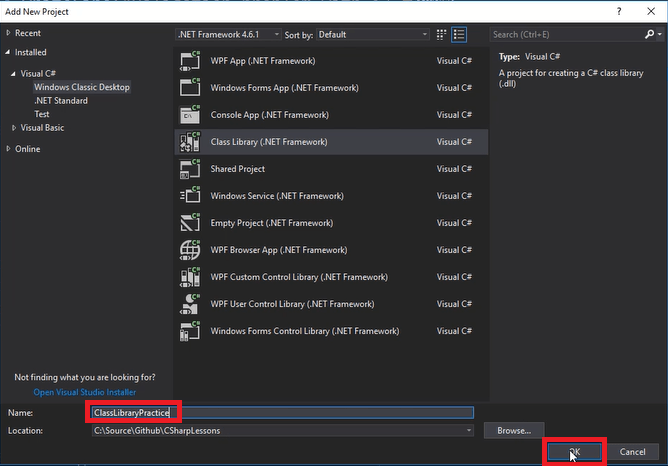
Class Library Project
What I’m going to teach you is how to create a class library.
I’m going to go ahead here to Section 2, right click, and say Add, New Project.

A new project will be added to our solution. There are many different types of projects that you can add to Visual Studio. You can see over here that you can expand, you can have Visual Basic projects.

You can download different online templates and if you’re working with C#, C++ or anything else, you can download all of those.
However, what we have installed here are three types of libraries. You can see we have a Test library, a .NET Standard class library, and a Windows Classic Desktop option. So, we can create here different kinds of applications.
If we want a Console Application that’s the one that has that a black command prompt that comes up and asks for user input. But in this case we want a Class Library.
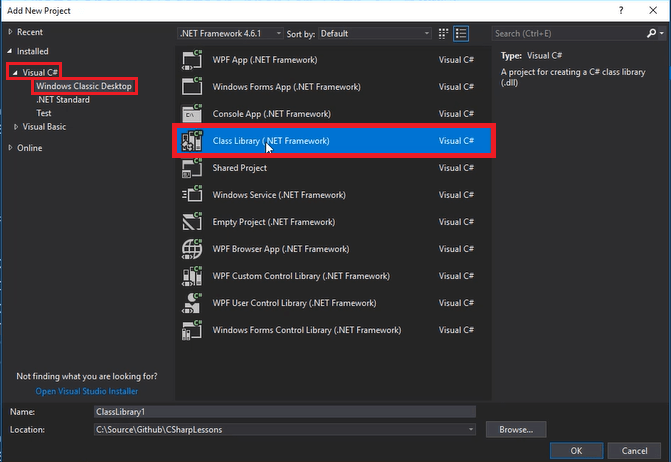
A class library is simply a collection of classes that you can use for your organization. It doesn’t have anything special in it, like for example, a Console Application, it has a static void Main method that is required in order to enter into the application.
All the flows scrolled through that static void Main method, but a class library is just a collection of classes used for organizational purposes. For test automation, we may use a class library to organize a bunch of classes. We may want to put our page objects in there, maybe our page object repositories or maybe just other collections of classes. That’s why we create a class library.
In this case, I’m going to call this a “ClassLibraryPractice”. That’s going to go ahead and get at it. I’m going to go ahead and click Ok. And so that’s going to get added to our section 2 folder.
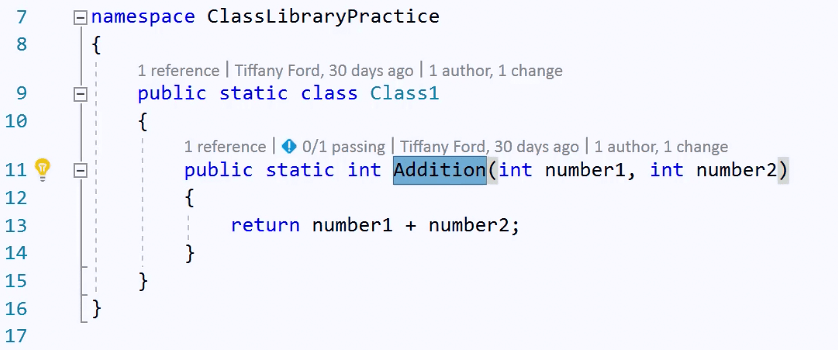
You can see is now added is a class library. This is how it looks like you can see it has a list little icon. It automatically comes with a single class already added to it, called Class 1.
![]()
That is the point of these different kinds of projects. They automatically come with a layout of everything that you might need to get started. As I said, a Console Application would come with a class that has a static void Main method that is required for entry. The Unit Test project will have different things that it automatically comes with, in order to help you do unit testing and all that kind of stuff.
The other thing that I quickly wanted to mention is that these folders, in the next sections, you’re not going to see these folders in the solution. The reason is, again, I’m adding this after. The fact that the class was created just to make an update, we added these folders after a bunch of the sections for organizational purposes.
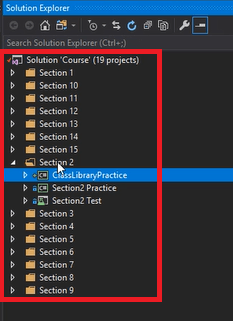
Even though you won’t see them in the next sections, just remember that everything is organized appropriately. Everything that you need is going to live in Section 2 folder.
In this section, recovering everything in Section 2, that will be all in here. Here’s all the content and these were also named differently in the sections. But they are exactly the code that you want, is the same exact code, just with different names.
Instead of being called Class Library practice as they were called in the section, they are now called this.
Again pretty much the same thing, just different names. I just wanted to inform you of that. All right! Let’s proceed!
Unit Test Project
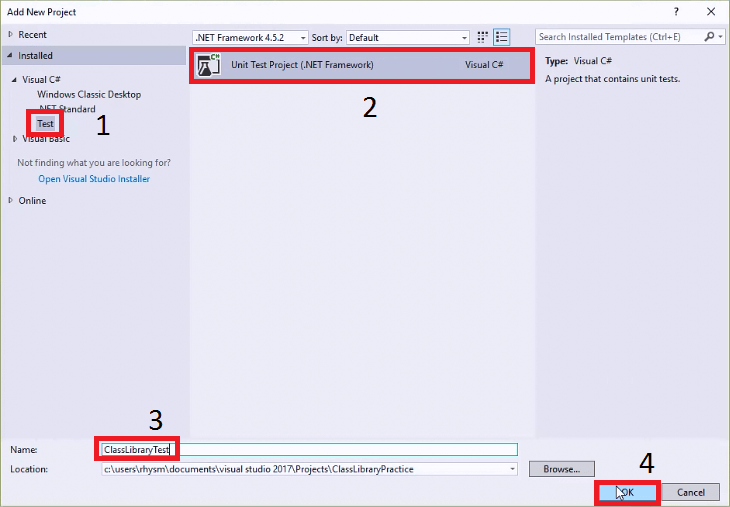
So, picking up where we left off. We are ready to create a Unit Test project that we’ll be able to use to test the code in our Class Library project.
To add a project to an already existing solution, we right click on the solution, add, and new project.
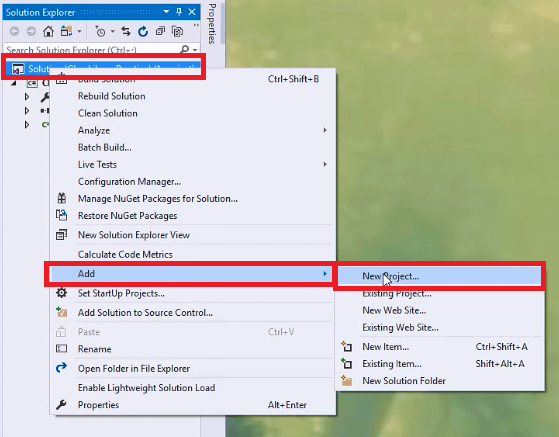
So, the new project window is going to open and under Test is where you will find the Unit Test project template.
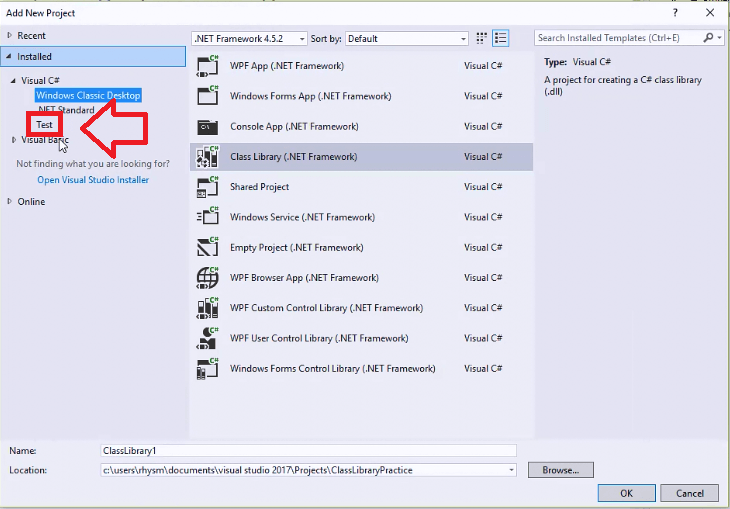
I’m going to call this “ClassLibraryPractice” and click Ok.
Now, we’ll be able to see once visual studio gets that setup for us that we have two different projects inside of our solution. We can move between the two.
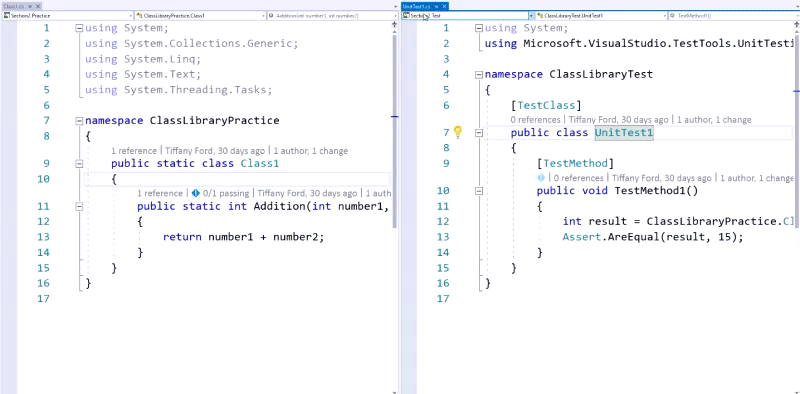
So, we’ll have the class library project that contains the code that we would distribute and give to, you know, someone who was working on this application. Then, we have the Class Library Test project.
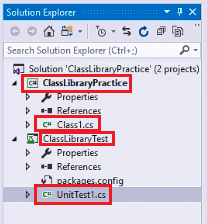
In here it looks a little different we have a test class attribute on top of whatever we’ve named our class here. It automatically names it UnitTest1 for us. Then inside of that class, we have these test methods.
So, we can have as many of these test methods as we want. Each method is going to test something about our software. Checking for a value, looking for a particular result, we’ll get into kind of some best practices in a later section. Right now, I just want to kind of show you how this works.
Sometimes we can write our code directly inside of the unit test and set up test methods with the code we want to test inside of them. But, sometimes, like in this case and in most professional situations you’ll run into, the code is already written that you want to test.
You just need to be able to access it from the TestMethod and run it and check the value.
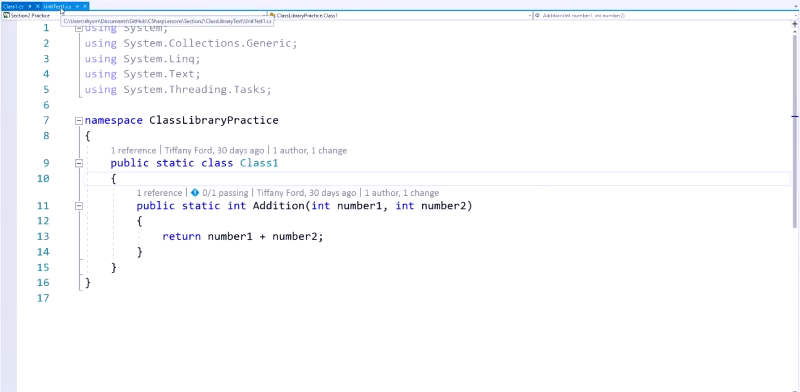
So, even though these two projects are inside of the solution together. We still have to connect them together by creating a reference. So, we’ll come down here to make sure you’re in your Class Library test, Unit Test project. Right-click your references and we’re going to add a reference.
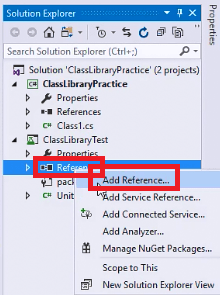
If it’s not already selected, choose Solution over here on the side. Here we can see our class library practice, just give that a check and click Ok.
Now, we’re going to see “ClassLibraryPractice” as part of the reference that we have.
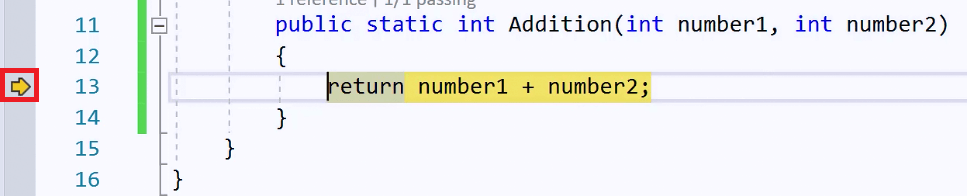
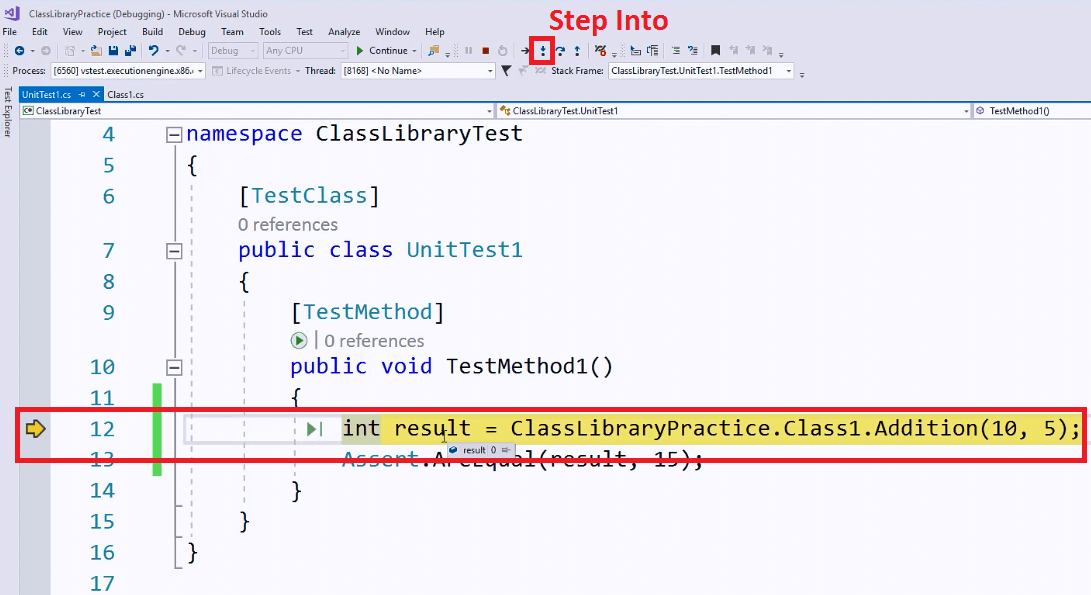
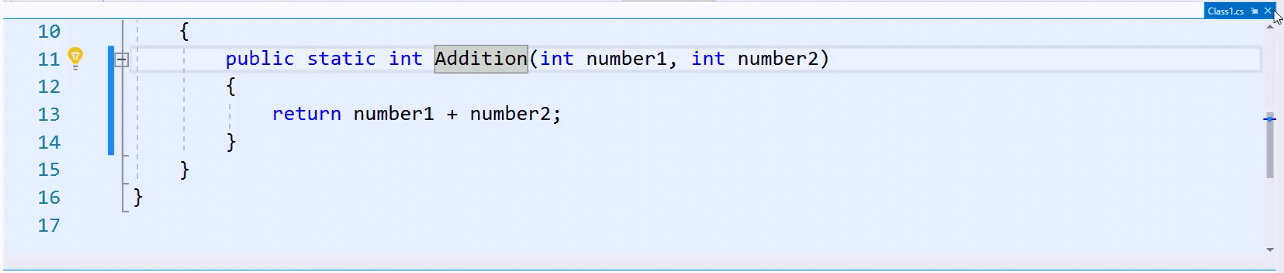
In our test method, what we’re going to do is, we’re going to call this method and pass over two numbers. Which looks like this ClassLibraryTest is our name space over here. Class1 is the class. Addition is the method.
I’m going to pass it a 10 and a 5 and since this is returning the result, we have to be prepared to catch that inside of some kind of variable of the same type. So, I’m just going to put that into result.
These test classes and test methods ultimately depend upon the idea of an assertion. We put an assertion inside of the test method which ultimately is what tells the compiler that a pass or fail has occurred. We use members of the assert class in order to setup the type of assertion that we want.
We can look at the documentation for the assert class that’s out there, we can see that there’s a lot of different methods. We’ll dig into more of this later on which version or what kind of methods that are in the assert class and how we use them.
But, most commonly, one of the ones that we use is Assert.AreEqual. This is just testing that two values are in fact equal. We could test if our result is equal to 15.
Now, I know if I pass over ten and five and they get added together that I’m going to get 15. But, we could change these values and then check for an expected result with a number of different tests.
So, to run the test you can either right-click on the TestMethod1() itself and go to Run Tests.
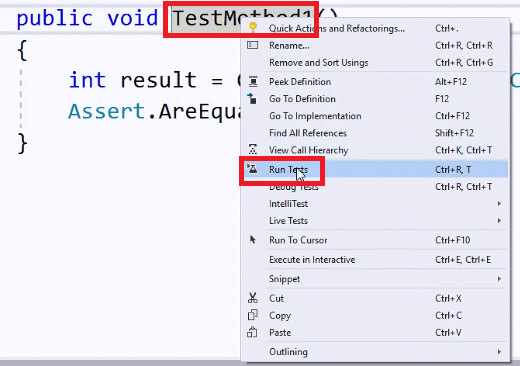
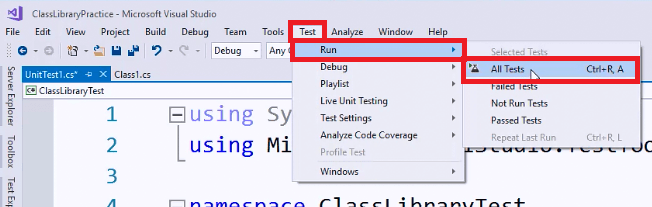
Or you can come up to the test menu and click Run, All tests.
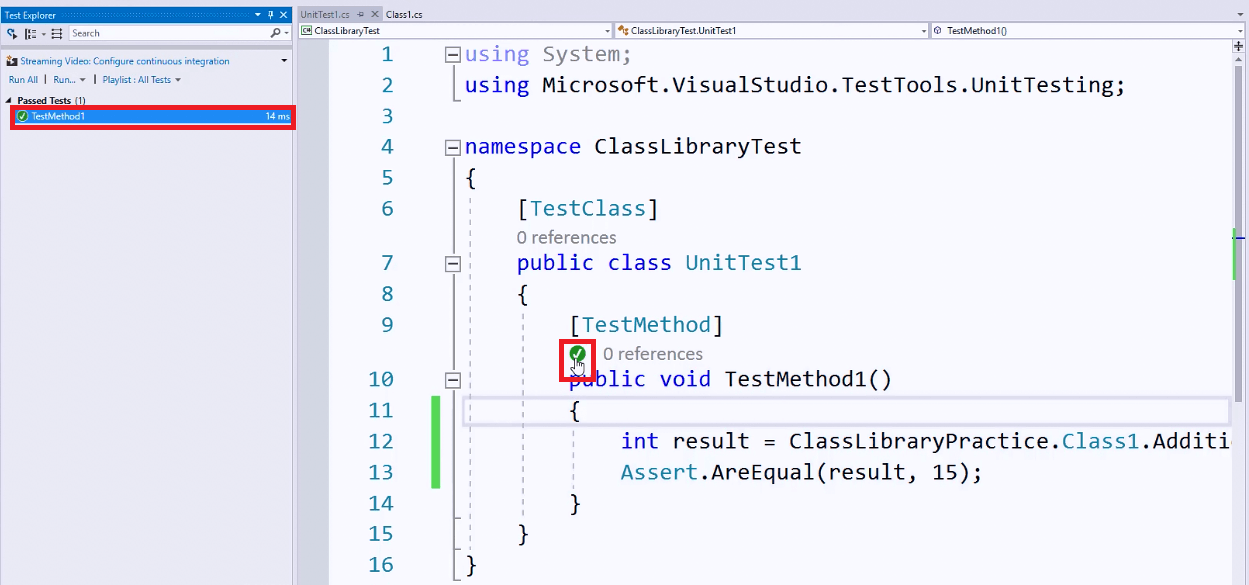
And, we get the test explorer window that’s going to pop out here on the side. You can pin it down if you want and this is what tells us whether it passed or failed. So, we get a green check here, we also get a green check right here below the test method attribute. That tells us if the tests passed or not.
If it didn’t, so let’s say, I think I’m going to get 10, all right?
I can click here and I can click Run and now I see it failed because obviously 5 and 10 are not going to give me 10. We can see down here in the test Explorer window that we got a 15, we were expecting a 10. That’s why it failed.
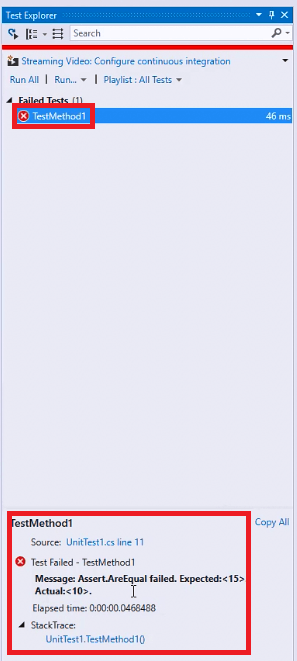
It’ll try to give you a little information about what went wrong and you can go through, look at your code and try to figure out what went wrong. Then, run it each time until you get a successful pass.
Debugging Basics
Ok! Now that you understand a little bit about the different types of projects we could encounter in Visual Studio. Of course there’s lots of different ones based on the template you’re using.
What I really want to get into is debugging. If you’re not familiar with the process of debugging, this is simply looking at some code results. If we’re not getting that right result, if we are maybe getting a fail on a TestMethod. Then, how do we track down a bug? How do we figure out where a problem might be?
The first thing I want to introduce you to is called a breakpoint. This gray stripe over here, on the left hand side of the window. Any executable line of code, you can click in this gray stripe and get this breakpoint object. You can see that it gives us the red dot and it highlights the line in red.
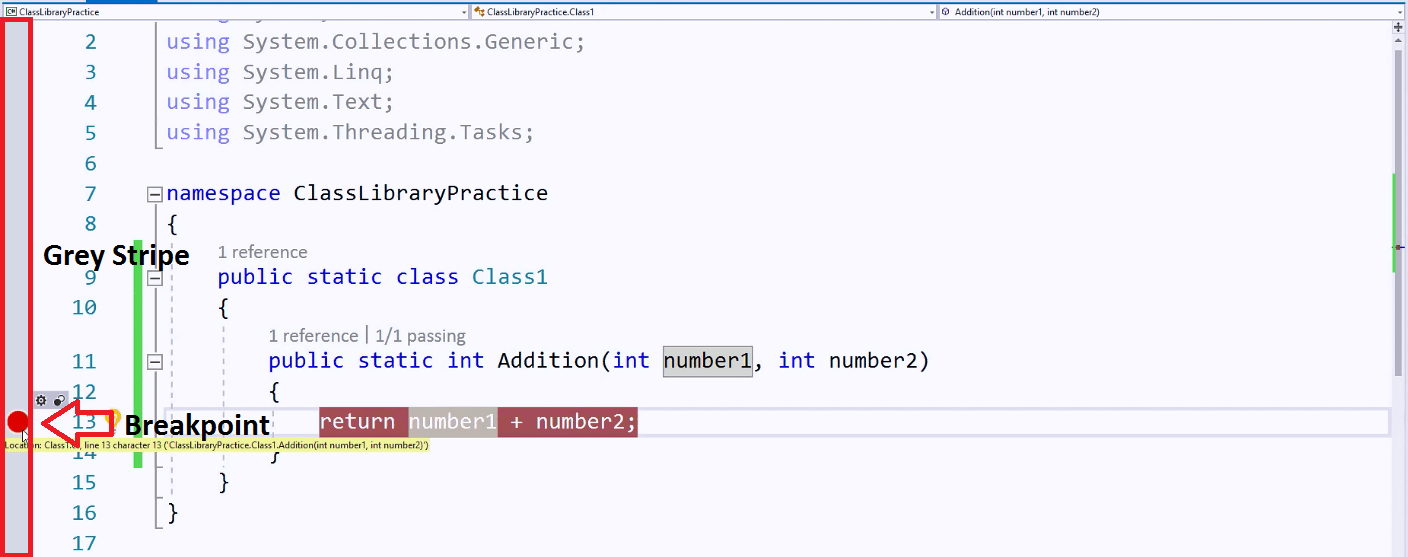
A breakpoint is a point in which the program execution will stop and allow us to walk step-by-step into the program to look at the variables, to determine what’s going on inside of the code, and help us kind of track down if we’re getting errors or we’re not sure where a value is coming from.
When we are running a TestMethod, we need to make sure that we’re running it debug or our breakpoints aren’t going to work.

But, we can go ahead and check out since I have a breakpoint set.
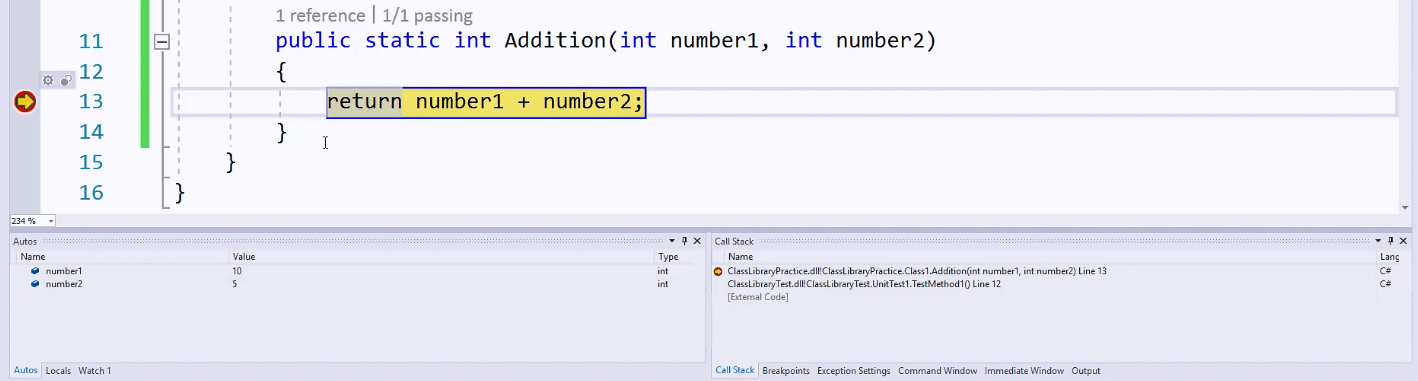
Here’s what it looks like when the program is running. We get a yellow arrow on our break point.
![]()
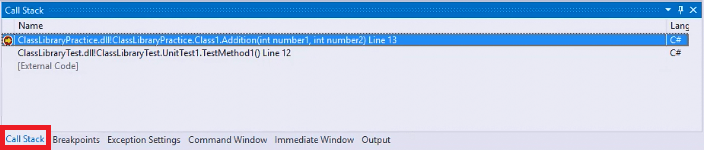
Our window looks a little different here. The first thing we see here is we get this call stack window, there’s a lot of different windows down here that pertain just to debugging.
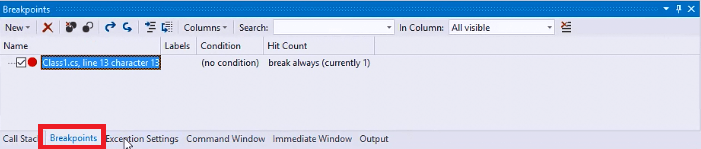
We can get a list of breakpoints and where all of them are throughout our code.
We get the call stack which is all of the different things that have been called, maybe different classes or different methods.
Over here we get the Autos window. The Autos window will show us all of the variables kind of as there in play, inside of the code, so that we can keep track of those values as they change.
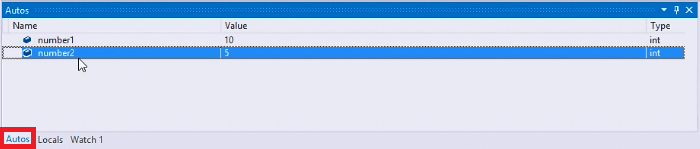
In the code editor window itself, we can also put our cursor over the variables and see what’s going on and what are their current values right now.

Up on the toolbar, we have some important things that help you work when you’re in this debug mode. So, step into, step over and step out, allow you to move around inside of the code. If we step into, like maybe we’re on a method or something, we can step into that code and see what’s going on inside of that method.
If we think that everything is is okay and we and we don’t want to look at that method, we can step over it. Move on to looking at other parts of the code. Or, maybe, we want to step out. Go back up to maybe a previous level of where you had stepped into.

If you’re done with your breakpoint, you can click on it at any time to get rid of it. You won’t stop there again every time the program runs.
When we step into, we can see that little cursor moves and there’s a little yellow highlight over each area.
Now we’re we’re back here in our TestMethod, we can see the result right now is zero. Because the line that we’re on, hasn’t actually happened yet. This is the current line of execution.
When I step into, we can see that the result value here it’s now red to indicate that it is a new changed value.
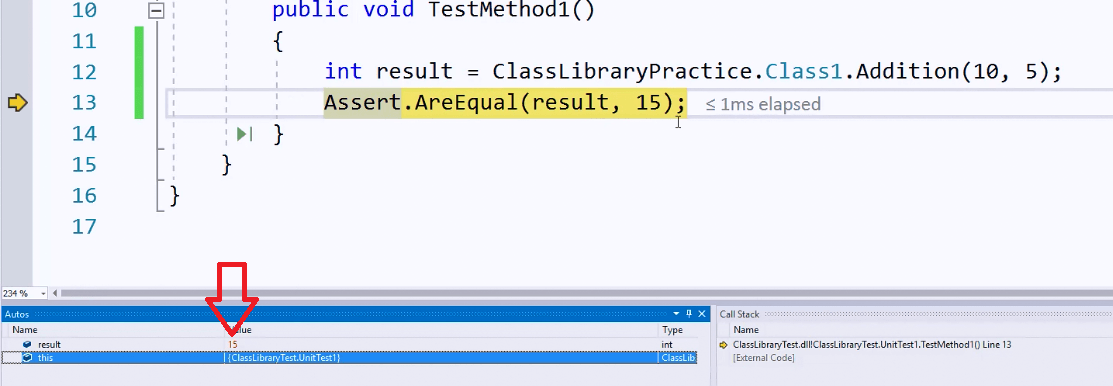
Now we’re going to move into the assert section. We can see now that’s done.
If at any point you just want the program to continue like it should, you can hit Continue and now we can see our method has passed.

So, using breakpoints is incredibly important kind of getting familiar with these debugging windows, stepping through your code line by line. This is how you’re going to find most of the errors that we have, that occur at run time.
If we have errors in the code while we’re writing them, we know we get those red squiggles, we can see those in the error list, and the program doesn’t run. But, if we are getting incorrect results, our tests aren’t passing, and we’re not sure why.
We’re getting a particular value or maybe we’re crashing at run time due to like an off by one error or something like that, a logic error.
Then, debugging and stepping through the code is going to be your best chance at being able to find those problems.
Common Shortcuts in Visual Studio
So, in order to help you get a little more familiar with Visual Studio, we’re going to talk about some common shortcut commands to help you be a little more efficient as you’re moving around in the interface.
The first thing I want to talk about is Peek. Lets us look at the definition of a method or another piece of code that we want to look at. In this case, we have kind of a piece of code here and we can look at this and say: “Well, maybe I don’t know what this does. Can I look at the definition of this?”.

I can get inside there and say well when I pass it 10 and 5 what is actually going on here? So, we can right click and we go to Peek Definition. But, we also see that “Alt + F12” is the hotkey for that.
If we put our cursor on there and hit “Alt + F12”, a little window pops out that shows us that piece of code and lets us peek inside of there very quickly.
We can also go to the definition by just clicking “F12” , going to Go To Definition on our list here. That’ll take us and open this file and you can see it opens in a tab up here. Now it took us directly to the file where we can see the whole thing.
We can do the same thing, put our cursor on and do “Ctrl + T” which gives us kind of a go to all search. So, we could look and see anywhere that that might be used in our program and go to some of the other places where we could look at that usage. So, you can see as we flip through here, we get a couple of different search results.
When you have multiple things open in Visual Studio, it opens them in tabs and we can “Ctrl + Tab” and switch through any of the open items that we have. Which can sometimes be faster if you’re flipping back and forth.

You can also pick these tabs up, move them, and get them into a side-by-side docked configuration. You can see when I pick that up, it lets me choose, maybe I want to put it overhead, so we get a top bottom configuration.
I can reorder my interface, if I want to be able to view my files in a different mode rather than the all open tabbed mode.
When we want to make sure that there’s no errors or anything in our solution, we want to build it. We come up to the Build menu and Build Solution, but we can also see “Ctrl + Shift + B” is the fast way to do that.
When you “Ctrl + Shift + B”, it’ll tell us, you know, the output of that build and if there are any errors we would see that down here.

Of course you have the common ones, you know, “Ctrl + C” for copy, “Ctrl + V” for paste, “Ctrl + Z” for undo. Those are pretty standard in all Windows applications now.
“Ctrl + F” gives us the find. We can try to find everything, as well as doing find and replace. From inside of the find, you can choose, you know, do I want to find it in a file? Open document, entire solution, just this block. We can kind of narrow that down.
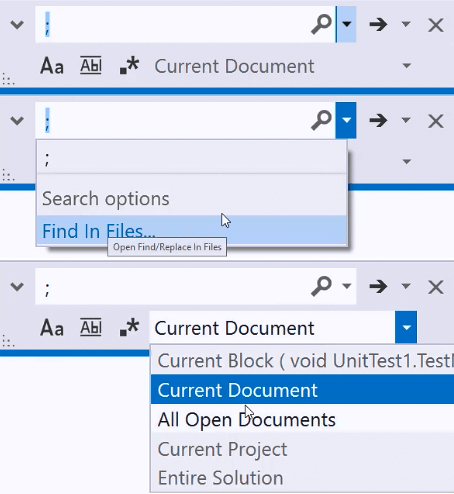
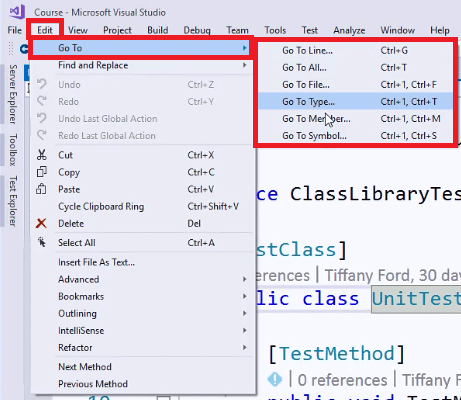
You’ll find these same commands over here under the Edit menu for find and replace. Then “Go To” also helps us if we’re trying to move around inside. You can see all the different shortcuts like “Go To Line” or “Go To All”. I showed you that where it pops out “Ctrl + T”.
If you’re just wanting to save your files, maybe you do have an error and the build isn’t successful. Of course “Ctrl + S” will give you save and “Ctrl + Shift + S” would give you save all.
If you do make a change, you’ll see up here in the tab there’s a little asterisk on any files that have changes that are not saved. You can see when I “Ctrl + S” the asterisk goes away.

If you’ve got the change tracking on, you’ll also see these colored bars over here on the side change to show that there was a change made. All I did was “Backspace”, there you can see there’s an unsaved change. Now there’s a saved change.
The majority of any settings that you might want to change are going to be found under the Edit section. There are a lot of different settings that you can get into in here. You can come in here and do things with uppercase, lowercase, commenting, word wrapping.

You can see that there are hotkeys for all of these over here on the side as well. You can enable bookmarking and toggle bookmarks.
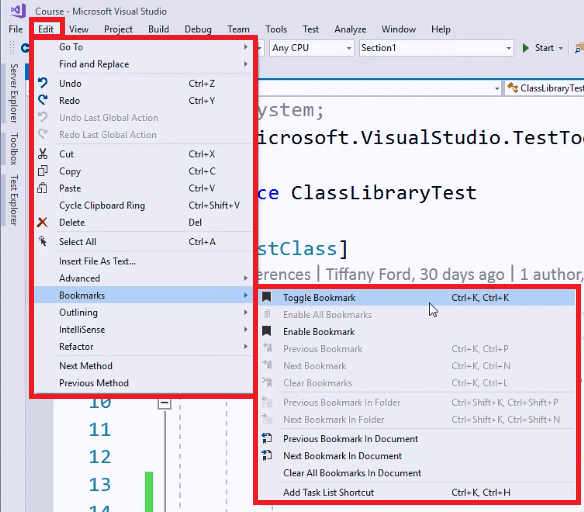
If you’re moving around inside of files, trying to find specific portions of the code quickly. Then, that is something that you might want to look into.
There are a lot of different features, settings and things that can get very specific inside of Visual Studio. But, for the most part, you may never need to touch them, depending on how you feel about the default interface.
Common Shortcuts in Visual Studio
| Definition | Shortcut |
|---|---|
| Peek Definition | Alt + F12 |
| Go To Definition | F12 |
| Go To All Search | Ctrl + T |
| Switch Tab | Ctrl + Tab |
| Build Solution | Ctrl + Shift + B |
| Copy | Ctrl + C |
| Paste | Ctrl + V |
| Undo | Ctrl + Z |
| Find | Ctrl + F |
| Go To Line | Ctrl + G |
| Go To File | Ctrl +1, Ctrl F |
| Go To Type | Ctrl +1, Ctrl T |
| Go To Member | Ctrl +1, Ctrl M |
| Go To Symbol | Ctrl +1, Ctrl S |
| Save | Ctrl + S |
| Save All | Ctrl + Shift + S |
| Redo | Ctrl + Y |
| Cut | Ctrl + X |
| Cycle Clipboard Ring | Ctrl + Shift + V |
| Select All | Ctrl + A |
| Delete | Del |
| Format Document | Ctrl + K, Ctrl + D |
| Format Selection | Ctrl + K, Ctrl + F |
| Make Uppercase | Ctrl + Shift+ U |
| Make Lowercase | Ctrl + U |
| Move Selected Lines Up | Alt + Up Arrow |
| Move Selected Lines Down | Alt + Down Arrow |
| Delete Horizontal White Space | Ctrl + K, Ctrl + \ |
| View White Space | Ctrl + R, Ctrl + W |
| Word Wrap | Ctrl + E, Ctrl + W |
| Incremental Search | Ctrl + I |
| Comment Selection | Ctrl + K, Ctrl + C |
| Uncomment Selection | Ctrl + K, Ctrl + U |
| Toggle Bookmark | Ctrl + K, Ctrl + K |
| Previous Bookmark | Ctrl + K, Ctrl + P |
| Next Bookmark | Ctrl + K, Ctrl + N |
| Clear Bookmarks | Ctrl + K, Ctrl + L |
| Add Task List Shortcut | Ctrl + K, Ctrl + H |
| Previous Bookmark In Folder | Ctrl + Shift + K, Ctrl + Shift + P |
| Next Bookmark In Folder | Ctrl + Shift + K, Ctrl + Shift + N |
I would recommend that you do some practice and get comfortable moving around inside Visual Studio. Practicing some hotkeys and just getting comfortable with your environment so that you can be more efficient as you use the program.
C# Programming Basics
Chapter 3
Intro To Variables
All right! We’re ready to get started with one of the most foundational building blocks of programming which is the variable.
A variable is very simply a name given to a storage area that our program can manipulate. That name is kind of whatever you want to call it, but we do want to lean back on those coding conventions and what we learned about what makes a good variable name.
In C# or, in particularly, in the.NET framework, we have a lot of different variable types that have some rules about what we can and cannot store in those types. One of your jobs as a programmer is not only determining when we need a variable, but what type it is that we need.
To get us started, we’re only going to be focusing on simple types which allow us to store things like integers, characters, floating-point numbers, decimals and boolean. We’ll also going to look about at strings very simply. Then, later, we’ll look at strings more in depth.
Here I am in our previously created “HelloWorld” console project. This is where we’re going to start getting some practice creating some variables.
When we are creating a variable in Visual Studio, we start out by giving it that type of what kind of variable we want to create. If I want to create an integer, which allows me to store whole numbers. I would write int and then I would give it the variable name.
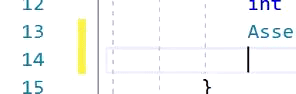
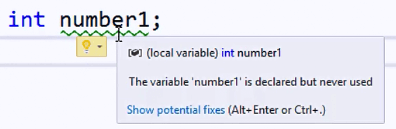
I’m going to name this one number1 and then we terminate our lines with a semicolon. Now, automatically, Visual Studio is going to underline this with a green mark to indicate that it is declared, but it’s not being used. When we put our mouse over that we see that message: The variable number1 is declared but never used.
When we are creating variables, we can also assign values to them immediately if we need to.
So, if I wanted to make sure that number one always starts out with a value of zero, then I could go ahead and set that to a value of zero.
Now, it’s still going to give me that green mark, because now it says it’s assigned but it’s never used. So, until I actually use this in some fashion, maybe in an equation, an expression or I ride it out to the console window.
Visual Studio is just going to give me a little bit of: “Hey you created this but you never used it, are you sure that you need it?”. That’s really the basics of creating a variable.
So, we can create char variables that hold a letter. Like maybe I just need to store the letter a and I don’t have to do this where I create the variable and assign it all in one step.
Let’s say I wanted to create a double which allows us to hold decimal-based values. Then, I wanted to assign that value later, I would just use the name of the variable and whatever value that I would maybe want to put inside of it. I could put like 2.5.
Now, you’re going to learn a lot about different types of variables and how you use them as you move along with some of our examples. But, one of the things that I do want to talk about is variable scope.
We’re here inside of our Main for our console application. Everything that we want to have take place in our program, it happens inside of this Mainmethod. Any variables that are declared inside of the Main method are not accessible outside of that.
So, if I have a separate method or a separate part of my program where I’m declaring variables, they’re not immediately accessible. We have kind of a heart hierarchy or level of things that we have to think about when we declare variables.
I can declare variables up here in the class.
That is then accessible anywhere inside of this class. Inside of the Main as well as maybe other methods that I would have inside of that class. If I declared a variable in another class, that isn’t necessarily accessible anywhere else in the program. It would only be accessible in the class.
So, we have this hierarchy of variables that we can think about. Good coding guides and standards say that we should only create variables for the level of access that they’re needed. So, we shouldn’t create every variable for our entire program at this class level.
Likewise, we may not want to create every variable here in the Main, sometimes we do just want variables that are appropriate only for this method or only for this class. A lot of that goes back to the fact that memory is used every time we create a variable.
The amount of memory used is based on this type. Well, how much of that memory we’re carving out to store whatever value it is that we might be using. We need to think about these things and make sure that we’re declaring variables in an appropriate place.
It’s something that you kind of get the hang of as you write some more programs and do some more projects. Don’t feel bad about it if you don’t get it right away.
Declaring Variables of Simple Types
Now that you’ve had an introduction to variables and you hopefully kind of understand, you know a variable is just a named location in memory. Let’s dig into this idea a little deeper.
C# is what we call a strongly typed language and what that means is that every variable and every constant has a type. We’ve looked at some of those types and every one of them relates to what that can hold and the types of expressions that you can execute on it.
It basically just kind of revolves around the idea that in non strongly typed languages which we would call loosely typed, we can get away with just putting any old value in any old variable. But, C# kind of enforces rules about that, so we have to make sure that we’re following those rules.
So, the C# compiler stores information about a type such as the storage space that a variable of that type requires, maximum and minimum values it can represent, members that it might have like methods, fields and events.
The base type that it inherits from, which we don’t have with simple types, we will have when we look at more complex types. The location of where that variables data is located in memory or where it will be allocated at runtime. And, the kinds of operations that are permitted.
The compiler uses this information to make sure that all of the operations that are performed on your data are what we call type safe.
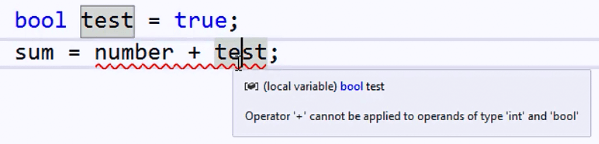
For example, if we declare a variable of type int and we give it the value of five, then the compiler understands that we can use an integer in operations like addition or subtraction because those are legal operations on an integers.
So, we could then create a sum and do some kind of mathematical operations, we could say something like, the sum equals our number variable plus five, right? Doing some kind of mathematical operation on integer values is completely legal, the compiler is okay with that.
But, if we wanted to create a boolean value which is a true or false value, then we wouldn’t be able to use that in a mathematical operation. I wouldn’t be able to do the same thing, right? That sum is number plus test, right?
It’s going to automatically give me the red line which indicates an error. If I put my cursor over that error, I can see that it’s operator plus which is addition cannot be applied towards operands of type int and bool. Because boolean variables the compiler knows there is no mathematical equation that would be a legal operation for this type of variable.
One of the first things that we’re going to learn how to do with variables that kind of relates to that type safety, aside from the fact that you have to make sure that you’re always putting the proper type of value into a variable is, how we accept values from the user.
So, in a console environment, we often have situations where I’m going to get rid of this, where we want to ask the user a question. We want to be able to get the answer to that question.
So, to post things right on that console window, we use Console.Write or WriteLine, the major difference is, with console right, it will write the statement and then put the cursor right at the end of the line. Like you might want to write more things on the same line. Whereas write line automatically puts that return or carriage return in there for us, so that things will end up on the next line.
In here, we’re taking in a string. A string has to be inside of double quotes and you’ll notice that the compiler writes it in red, which indicates that it is a string.
So, one of the reasons why I point this out is because when we’re accepting values from the user. They type in their favorite number, we want to put that into an integer value. So, into this number variable, we’re going to accept what comes off of Console.ReadLine().
Well, the problem here, and you can see in the red is that Console.ReadLine() is going to give us a string, but we’re trying to put it into an integer.

So, one of the most common things that we have to learn how to do with variables as it involves type safety is converting. We would convert this value to an int32 value which is a basic integer. We’re going to put inside of the parentheses our Console.ReadLine() statement, because that is what we’re accepting from the user.
When we run this program, it will ask us what our favorite number is and we’ll be able to take that into our variable. Now, if you want to test this, you could come up to your Debug and I’m going to actually Start Without Debugging, because if you run it with debugging it will just open the window and close it real fast. You won’t be able to see this.
But, we can see here, “What is your favorite number?”. If I type in 10, then the program is just going to sit there and do nothing, because it’s not designed to do anything further.

But this is one of the most important things that we have to learn how to do, is make sure that we’re accepting values and getting information in the proper format that we need. Being able to convert it if it’s not already in that proper format.
Formatting Text Using Concatenation
So now that you understand a little bit about variables, type safety, and how to use them in a program, I want to get into one of the more popular things that we can do with text which is called concatenation.
Concatenation is the process of appending one string to the other and putting two strings together using the plus operator. This is a little different than when we use plus for mathematical operations or math expressions. When we have multiple strings and we want to append them together, so that they make one string, we call that concatenation.
Taking what we learned about how to ask the user a question and how to receive information back from the console. We’re going to actually create a little console application that reads in some information about the user, concatenates it together, and, then, delivers it back to the user. So, they can see the string.
We’re going to create a couple of variables to start with. We’re going to need a string to hold the users name, I’m actually going to call this first name, userFirstName. And, a string to hold their age.
Now, when you’re holding numbers like age, you kind of have to ask yourself “Am I going to do mathematical operations on it?”, and “In which case you need an integer, a double or some kind of numerical value?”. But, if you’re not, then you can put these kinds of values into strings.
It’s one of those things that we have to learn to evaluate as software developers, what type of variable do I really need in this scenario. So, let’s ask the user their name, we’ll use that Console.WriteLine() statement again to ask “What is your first name?”.
Then, when they respond, we’ll put that into our userFirstName variable. Since we’re accepting a string, we talked about this last time, read line gives us string responses, so we don’t need a convert in this statement.
We’re going to ask the user another question, what is their age. So “How old are you?”, and we’re going to accept that response into our age variable.
At this point, we’ve asked the user two questions. We should have values in our userFirstName and age variables.
Let’s concatenate these together into a response. I’m going to create a variable here named response. It’s going to say “Your name is:”, and now I’m going to put a space between the colon and the end of this string, so that it actually formats this correctly, plus operator for concatenation, and then userFirstName.
So whatever they put in, we want “Your name is: ”, colon space, the value they gave us. Concatenating again, “and you are”, how many ever years they gave us, “years old”.
Here’s a good example of concatenation. We have a string, which we would call a static string, because it doesn’t change. Concatenating in a variable, concatenating in another part of a string, and another variable. Then finishing the string.
So, we kind of stitched together the response so that we get a nice sentence like structure. Now we can write that out to the user. We want to give the user back the string response, you could also take this and put it in the parenthesis here. But I did this to make it a little more readable.
Let’s look at our program and see what it looks like, give it a test.
So, “What is your first name?”. I could say my first name is Karen. And, “How old are you?”. Maybe Karen is 16, so we should be able to see the statement: “Your name is Karen and you are 16 years old”. Right?

Great! So, concatenation is super easy, we simply use the plus and we can stitch together any amount of strings and variables in any kind of format that we might need.
Using String Interpolation
So, you’ve learned about string concatenation, but one of the other things that we’re going to learn how to use is called string interpolation.
String interpolation is basically a way where we can create placeholders inside of a string which are replaced with a value of a variable instead of having to do a lot of complicated concatenation. That might end up being really difficult to read, hard to set up and maintain.
I’m using the previous example that we wrote for concatenation of our console application that takes in a first name and age and then concatenates the string response.
What I’m going to do here is actually just comment out this line, so that the compiler will ignore it. But we can keep it for kind of our comparison purposes.
I’m going to show you how to write this string using the interpolation instead of concatenation. With interpolation, we would create our string, any way that we wanted, using these placeholders.
I’m going to put “Your name is”, and, in here, I’m going to put just {name}, whatever I want to call it. We had a colon, “and you are {age} years old”. Now our variable names have to match, so let me check that I’ve matched my variable names. And, I’ve ended my string. Then, these strings begin with a dollar sign, so we would stick $ out front to let the compiler know that this is an interpolated string.
Now, you’ll notice the minute I put that dollar sign in there, these didn’t turn red, they’re now black. So, that lets you know that you’re kind of on the right track here, we should see the exact same response as we got from our concatenated string in the previous example.

But, it doesn’t allow us or it doesn’t require us, to set up our quote marks, our spacing, our plus marks and everything where we need them. We can just stick those right in there with the curly braces.
So, if we give this a little test run, we should see “What is your first name?”. And, I use the same data I use last time which is Karen. And, “How old are you?”. Karen is 16. So, “Your name is Karen and you are 16 years old”.
We get the exact same response that we got from having the concatenated string.

But, this is a much more readable format. I’m not saying don’t ever use the plus operator and concatenate strings together, because sometimes the plus operator, you know, it’s easy to use, it makes for intuitive code, if it’s just a simple statement. You know?
This line here you have no trouble reading it and understanding it. But, once it’s like really long, it’s off the screen, and it’s word wrapping around in the IDE. You’ve got parentheses, you’re doing conversions for type safety and things in there.
It can get really confusing to read and it just makes for kind of a sloppy looking statement.
So, kind of lean on your judgment. If you feel like “Hey, this is an easy statement”. And, it’s intuitive to just concatenate these together. Then, by all means, continue to concatenate.
But, when you have more complex statements, that make more sense to use the interpolation. Or if you just think, “Hey, this looks nice and it’s easy and I can remember how to do it”.
Then, again, by all means, there’s a lot of different ways to accomplish the same thing in programming. You’re going to learn many different ways, even just to join two strings together.
So, it’s not one of those things where there’s maybe a right way in a wrong way. It’s just what’s appropriate for the situation, what are you comfortable with, and what makes sense.
I hope you just kind of use both so that you get familiar with them. Hope that you learn how to build, you know, more complex strings with these different methods.
Formatting Text for Output
So, now that we’ve looked at some ways that we can format our strings. I want to get into how we can specifically format a string and get the item to look exactly the way we want it to look in the output.
I’ve put together a quick program here that gives us a price per ounce for whatever this item is. We’re going to format that string the way that we want it. Right now, it’s in just a basic concatenation and then we’re writing it out to the user.
So, if we look at this program, all it does is output “The current price is 17.36”. We’re not seeing really anything, you know, like fancy going on here.
The first thing I’m going to do is, I’m actually going to put this into what we call a String.Format method. One of the first things that we need to think about is, we have the type string which is a variable type, and, in which we can store string data. But, we also have a class built into the .NET framework called String.
We can use string and you’ll notice the difference that it’s capitalized, String.Format and put these items inside of the parentheses. Because format is a method that I’m calling, it’s going to let me do some things that I want to do to this string, to output it the way I want.
You notice the difference in color, string variables are dark blue and lowercase. String class is a lighter blue and uppercase.

One of the first things I want to do is create what we call a placeholder index inside of this string, change the way that the string is set up.
When we’re using String.Format kind of like our interpolated strings, where we put variable names, these are an index starting at zero. Then, I put a comma, I can have a comma separated list of variables in this string that will replace whatever items I’ve put in here. Starting with 0, 1, 2, 3, etc.
The changes I just made to our program shouldn’t change this string as we see it. Because I haven’t applied any formatting yet, but what I can apply here is some formatting.
Let’s say I want this in a monetary format.
I could put :C. That’s automatically going to format that variable into a monetary, with the dollar sign out front and a two digit decimal place if I had more than two digits in the decimal.

There’s a lot of things we can do with this kind of formatting. It’s not just about numbers, although sometimes we want to make sure that we are displaying a certain number of decimal points or not, in some cases.
Sometimes it’s also about controlling spacing. I added a string for an itemName, maybe we want to set that up in more of a table like format in our output, with our price. I could format this string, to set up some columns for me.
Inside of curly braces column 0, the first number is the index so we would start at 0. The second number is an alignment number, so I’m going to make these all the same. Let’s do 1. These would be my columns, I’m going to have two columns. Then, in the columns I want the item name and I want the price per ounce.

So, we set up as many columns as we need, starting at index 0. We set up the items that are going to go inside of those columns, then what we get is a nicely formatted set of items.
Let’s say we wanted to add in some column headers, that might be something we would want to do. I could write a line right before my table gets output, that does essentially the same thing but actually says Item Name and Price. Actually, we call these string literals, just writing out what I want them to say versus variables. Make sure I’m using right lines for both of those.
Then, let’s look at what that looks like. Now I get item named, widget, price, right underneath. Nice spacing, kind of a tabular format.

There’s a lot of things that we can do with the String.Format. There are things that we can do to format dates which is important, being able to put things in particular amounts of time, controlling alignment.
You can look at the full specification for the String.Format method in the MSDN documentation.
I strongly recommend that you do that and just get some practice.
They’ve got a bunch of examples in here, you can get some practice writing some different types of String.Format things and outputting stuff to the screen.
Verbatim Strings and Escape Sequences
So, at this point, you know quite a bit about strings and things like concatenation. But, there’s one of the things that we need to pay attention to, that’s when we have situations where we want to be able to put things in strings.
But, for whatever reason we’re using things like special characters, backslashes or we need to be able to tell the console that we want to do certain things. We call these escape sequences. C# defines a whole bunch of different ones.
Character Escape Sequences
| Code | Outcome |
|---|---|
| \' | Single quote, needed for character literals |
| \'' | Double quote, needed for string literals |
| \\ | Backslash |
| \0 | Unicode character 0 |
| \a | Alert (character 7) |
| \b | Backspace (character 8) |
| \f | Form feed (character 12) |
| \n | New line (character 10) |
| \r | Carriage return (character 13) |
| \t | Horizontal tab (character 9) |
| \v | Vertical quote (character 11) |
| \uxxxx | Unicode escape sequence for character with hex value xxxx |
| \xn[n][n][n] | Unicode escape sequence for character with hex value nnnn (variable length version of \uxxxx) |
| \Uxxxxxxxx | Unicode escape sequence for character with hex value xxxxxxxx (for generating surrogates) |
You’ll notice they start with this backslash character, and, in some cases are just backslash and some kind of character in order to indicate the type of escape sequence that you want to use.
A lot of times what happens is we get into a situation where maybe we want to put in like a file path or directory, especially when we’re saving a file the user is uploaded or something like that. So, we need to be able to put in you know like, “C:\my documents\homedirectory\files”, right?
And, you see all of a sudden the compiler is putting those red squiggly marks underneath the backslash character. Because we can’t use the backslash character directly in a string like that, essentially breaks the string.

There’s two ways that we can solve this. First, we can use that escape sequence thing I just showed you. In order to put a backslash in a string, you just actually put in the backslash character twice. So, you can see that resolves the problem and only one backslash character is what would be printed.
So, we can test that by just writing the file out, then taking a look at what we get in the console window. We see just one backslash in here. Now this one, it didn’t print.

You see there, it’s got like a funny character? If we go back to our list, you’ll see in our list the form feed character \f is actually part of this list. This is why the compiler is letting this go, even though, that’s not what we intended.
If we looked at that again in the console window, we can see that just says “iles”, because it’s actually cutting the “f” off, thinking that’s something that we want.

Now, another way that we can get around this is by using what we call a string literal, or a verbatim string. Out in front of the quote mark we put the @ sign, then you saw that automatically cleared all of the errors that we had inside of that string.
Now you can see it’s complete including our \f.

What does @ sign is telling the compiler is, take everything in this string literally, as I’ve written it, don’t try to interpret any special characters, escape sequences or anything in there. This is often what we have to do in this situation where we might have a special character, a backslash or something we want to use.
But, that list of escape sequences and things that I showed you, has some uses. Maybe we want to put in like a carriage return actually in the middle of our string. So, the \n is what we use for carriage return.
That actually forces, you can see now, it’s on two lines.

Maybe we want to be able to insert in an unicode character. So, that we can get a special character that we’ve looked up from unicode. Again things like, if I actually want to print a quote or a single quote I would have to have that escape sequence in there.
It’s something that we definitely have to pay attention to. Either to escape out those things by putting the backslash character in there or by putting the @ sign out front. And, if you use the @ sign, I’ll show you now what we get is a completely literal string with that backslash in, right in there.
It will just print whatever you put in there.

You need to make sure that you understand the usage or you’re going to get unexpected output.
Unit Test Project
Chapter 4In this chapter you will understand the unit test project and how to use the MSTest framework to perform many best practices such as:

Unit Testing Best Practices
In this section, we’re continuing to talk about unit testing. What I really want to talk about are some best practices. Because when you’re just getting started, it’s easy to create some bad habits.
Like most things, it’s better if we learn how to start doing things correctly the first time, that way we don’t have to unlearn those bad habits. As well as you know, it’s always that saying, it’s better to start the way you mean to go.
We know that unit testing is a method for which we have these individual units, right? We always want to think about that individual units. This is important because when we are testing software, we tend to think of our program as this huge box of all of these different things.
In fact, it’s not, you know, essentially, this huge box. But, it is a collection of individual little components inside of here. As software gets bigger, we might actually even be able to drill into one of these components, and, actually see that it’s made up of smaller units inside.
So, ultimately, this is what unit testing is about. It’s about trying to grab one of these small pieces and do some testing on it. We do unit testing because this can significantly increase the quality of our code. Some basic tips for unit testing.
Number one, we only want to test one piece of code at a time.

This allows us to continue thinking about that basic simple piece that we’re trying to get ahold of.
We want all of our tests to be independent.

What that means is that tests shouldn’t depend on each other. We call this chaining. Don’t let first tests change something for the outcome of test two.
We always want to use good naming conventions.

Thinking about when we name a method, a test method, it should have a nice intuitive name on what the point of the test is. We should have good variable names, don’t skimp on, you know, the code readability just because you are writing a unit test.
Going back to only testing one thing at a time, we should only have one assertion per test method.

This helps keep us in that frame of mind, where we’re not testing more than one thing per method.
Most people learn what we call the FIRST principles of unit test. They should be Fast, which means that we don’t want a unit test to take up or waste a lot of productivity time. A test should take maybe on average 300 milliseconds to execute. Otherwise your test is probably too large.
They should be Isolated. We don’t want unit tests that depend on other unit tests. We don’t want this design to overlap, we don’t want the outcome of unit test one to change what could be the outcome of unit test two. Think of them as little silos, don’t allow this overlap to take place.
They should be Repeatable. Repeatable test is one that gives the same output or the same result every time we run it. In order to achieve repeatable tests, we often have to isolate from anything in an external environment. Which is a good idea to think about when we’re doing unit tests.
S stands for Self-Validating. Self-validating means that a unit test should be able to determine if the output is expected or not. All in one go, the test should determine either a pass or a fail. We shouldn’t have any manual interruption or manual requirements inside of a unit test in order to get those results.
Then, finally it should be Timely. This is a little different from fast, but a unit test should be written even before production code makes the test pass. I know that’s not always practical but we can write a unit test at any time.

Guidelines for unit testing, you know? We want review processes, we want to make sure that we’re thinking about tests as we’re writing code. Not thinking about tests as an afterthought.
Some of these are just some best practices to think about. Wherever you go work is probably going to have their own rules and kind of guidelines they want you to follow. But, these kind of gets you started on the right path of how to think about unit tests, and, start implementing unit tests into any code that you might be writing.
Different Types of Assertions
In this section, we are tying together everything that you’ve learned so far about C# variables, making simple types, doing things with unit testing, and really trying to put all of this into a context.
We’re going to start working on a unit test project that lets us practice some of these skills. Here we are in our test project. I’m just going to get started by taking this test method and renaming it. We’re going to start some practice with the AreEqual assertion.
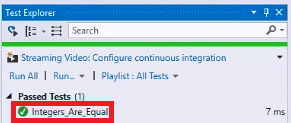
I’m going to call this integers AreEqual. You learned about simple integer types where we can create some number, we can initialize it to a value or not at the time that it’s declared. But, when we are doing unit testing, we often want to assert to find out if a value is equal to something. If I want to test if some number is equal to 10, then I could write a test like this. Where I’m asserting using the AreEqual method that this variable is equal to this value.
We’ve learned how to come up and run our tests to be able to see whether or not that fails. We can see we got the green check, we can come over in the test Explorer and see that it passes because the value is in fact 10.
Now, if we looked at the MSDN documentation for assertion, we can see that the AreEqual will take not only integers but any of our simple types, and then it will take more complex objects, will also take strings.
We could also write a similar method. I’m just going to copy and paste and say integers AreNotEqual and use the not equal method in order to test for something not being equal. In this case, because they are equal, this test will fail.
Now, another handy feature of methods like AreEqual is that we can actually specify a string out here as a message that will be displayed if the assertion
fails. In this case, we’re testing to see if they are equal and when the assertion fails we’ll see this message.
Let’s go ahead and run. We can see the test fails, we can see expected 10, actual 12. Now out here, we actually see the little message that we just put into our assert. These numbers are not equal. This is a great way of communicating inside of the testing environment about some expectations for the test or some expectations for your values.
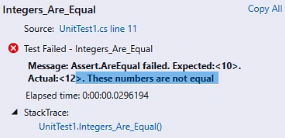
I also showed you previously, the StringAssert class. While there’s lots of methods for testing things inside of the assert class, we also have StringAssert that we can use when we want to test some strings.
So, if we have a string in here, we can use StringAssert and we looked previously at Contains but we also get some nice functions like EndsWith or Matches. So, I can actually come in here to EndsWith and determine if word ends with an “ing”.
We can see that passes because it’s looking at the end of this string and matching what we want it to end with.
Just like I showed you up here with the regular assert, we can give a message, so “This test only passes if the given string ends in ing”. You can give some information, let’s go ahead and change our word to “no”, just so that we have a failing test.
If we run, then we can see EndsWith fails string “no”, does not end with string “ing”. This test only passes if the given string ends in “ing”.
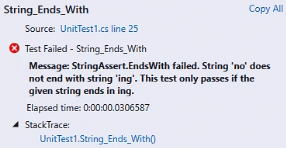
As you’re looking through the documentation, there are a lot of different methods that you can use. I recommend that you get some practice with using different types of assertions, but we’re going to do some examples in the next couple of sections to help you have kind of a real-world context with some of these tests.
More on Assertions
Let’s dig into our asserts that we can use in our unit testing just a little bit more. Here I am in the MSDN documentation where it talks about the assert classes.
We have several different ones that we can use in our code, so the three main ones that we have are just Assert which we saw previously in our example where we were using Assert and the AreEqual method to compare a value, to see if it’s equal.
You can come in here and learn more about the assert class and all of the different methods that are available. I can see things like AreEqual for various different types, we can come down and see we can also get AreNotEqual. If you’re looking for different types of assertions you can come into the documentation and review those. Now, there’s two other ones that I want to introduce you to.
The first one is CollectionAssert, we haven’t talked about collections yet, but when we have collections of objects, things like type lists. Or when we start moving into different types of system collection, anytime we need to compare collections of objects, we use CollectionAssert.
We get many of the same method functionalities that we get with regular assert. But, they’re all designed for testing lists of items. I’ve built an example over here for you to look at. This is our previous age checker program that we were working on. I built a new test method in our unit test class called testing collection assert.
I just set up two basic lists and you could probably visually look at these two and say “Yeah, they’re the same or maybe they’re not the same” . When we want to compare two lists, we can use, instead of a regular assert, we can use CollectionAssert and AreEqual method to take in the expected list and the actual list.
When we run this test, it’s going to compare those two lists and we can see we get the green check. Because these two lists are in fact identical. It’s not just looking for the number of elements, but it is looking at how many elements we have in each list. It’s looking at the values and it’s comparing if each value is in each place. 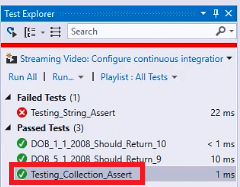 If we move some of these around and switched places, then the test would actually fail. Because, it’s actually looking for an equal. We could actually look through a list looking for actual values using something like CollectionAssert.Contains. Sometimes we want to know if a list contains a particular value. We could do CollectionAssert.Contains the list we want to check and the value we want to check for.
So, we can see that this test passes if we come up here and run it. Because this list “actual” does contain the value of 100. But, if I test it for 500 which is not in the list, then we can come in here and run. See that we get a failure. It’s a nice way to check to see if a value exists inside of a list. CollectionAssert is is the only way that you should check for things inside of these collection list items.
Then, we have StringAssert. The StringAssert is a class that is dedicated to all kinds of methods that allow us to test strings. Similarly, we have things like Contains and we can look for things like Matches, EndsWith, StartsWith.
In order to go through and see if a string actually contains something that we want. Here’s another test method that I’ve set up for testing our StringAssert.
I’ve set up a string, it says “something” in lower case. And, StringAssert.Contains contains the string we want to test. I’m looking for something in the upper case and we can see that this test does not pass. Because with strings, when we’re using contains, the casing matters.
If I actually wanted this test to pass, I would need to change one of these so that the test in fact is looking for the same kind of string. And, now we can see that the test in fact passes.
 We can see here in the documentation where it does note that Contains, you know, is case sensitive. We need to make sure that, you know, we’re expecting that. There are also some regular expressions which I know we haven’t talked about, but if you’re familiar maybe with regular expressions. There are some methods in here that help you compare regular expressions strings. Verifying you know that a string matches a regular expression or something like that If you’re doing that kind of testing. In the MSDN documentation along with the three different types of assert classes, we also have several exceptions. If you’re testing for certain exceptions, maybe you’re looking for particular AssertFailedException in your testing. But usually we just look here in the test Explorer to see if our test is failed or if it’s passed. Remember we looked at how we can come down into this message and kind of determine if it failed.
 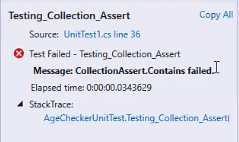 Now, in the case of a case sensitivity, it’s not going to tell you. It’s just going to say that it failed. Let me show you that again, if we change this and run.
It says that: string “something”, in lower case, does not contain string “Something”, in upper case.
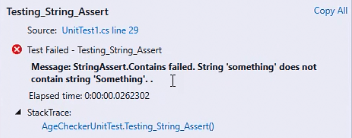
It’s not going to explicitly come out and tell you that this is a case sensitivity issue. That’s something you have to learn, go and look in the documentation to make sure that you understand the requirements of the assertion methods that you’re using.
I hope this helps you if you are doing some testing and picking the right type of assert.
Unit Testing Attributes
Let’s dig in a little bit deeper into these attributes that we have as part of a unit test class.
These tags that we have here are called attributes. If we come in here to the MSDN documentation under the unit testing namespace, we can see that there are a lot of these class attributes that we can use in our unit testing classes.
Attaching some of these attributes is required. In any unit testing class we have to have this TestClass attribute on here in order for the compiler to understand that this class will contain unit testing methods.
Now, we’ve talked a little bit about best practices as far as, you know, having your method do one thing and one assertion per method. But, we want to make sure that we include this test method attribute on each one of these methods, because this is ultimately how the compiler determines which tests we have. Helps us break out which ones have failed and which ones have passed.
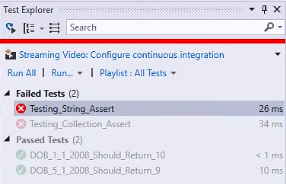
This test method attribute is always going to be required on any method that you need to put into your test class for your unit testing.
Let’s talk about some other ones that are optional because these are all required.
The first one that you’ll probably use a lot is called Description. Description allows us to put in a description inside of one of these attribute tags. We put Description and then inside of parentheses, inside of quotes, what we want as a description of the test. Similar to maybe commenting or documenting in your code, this is a good way to talk about what you want to achieve with this particular test.
Another common one that we see is ExpectedException. This allows us to tell the compiler that if this test does not work out then we have a particular exception that might be thrown. You would put ExpectedException and then typeof to determine the type of exception class that you want to put in.
There are quite a few built-in exceptions which are just errors. Maybe a divided by zero, an arithmetic exception or an access violation. Whatever type of error message that you’re expecting, whatever type of exception that should be or could be thrown by this particular piece of code while the test is in process. Then you would want to put that in here to let the compiler know that that’s an expected item or an expected behavior.
Now up here at the top of the class, you could put these anywhere inside of your test class. But, I’ve added a couple of also common ones that we see when we have maybe some setup or some finalization things that we need to do.
The first one is ClassInitialize, we can use ClassInitialize to run code before we would run the first test in a class. If we need to setup values or kind of get your code into a place where it’s ready to test, we would set this up in a class initialization method.
Similarly at the end, if we have things that we need to clean up after we’ve tested. Maybe resetting some values, removing some temporary files or things like that. You can put this inside of a ClassCleanup method.
Then, we also have TestInitialize which could be put before each test method that you have if you have particular values, you just need to set up, or change before your test method is run.
And, likewise, TestCleanup. We can do some initialization steps, run our test method, and then do TestCleanup and these attribute tags tell the compiler that these are specific steps that need to run inside of these unit tests.
Usually with TestInitialize and TestCleanup to make sure that before and after each individual test that you’re running, your tests aren’t coupled together. Because really best practices tell us that although all of these methods are hanging out inside of this class together, they are ultimately independent tests and should not depend upon each other.
We use TestInitialize and TestCleanup a lot to ensure that they are separated and that coupling isn’t happening.
As you move forward in this course, we’ll be using a lot of these different types of attributes as we write further unit tests. Just keep these in mind as you are working. Especially if you’re working on any side projects on your own, so that you can get some hands-on practice.
Using TestContext Class
So far we’ve been introducing various different types of tests, unit tests assertions and things like that.
The MS test framework is what we’ve been working with so far, but often we need to be able to leverage or store information that is provided to unit tests. That is one of the reasons that we use this TestContext class.
Here we are in the MSDN documentation that gives us an overview of some of the properties and methods that we can use inside of here. One of the main reasons you would use this kind of class is when we have a data source. We want to be able to link up the unit test that we’re writing with data rows from that data source.
There is a great blog on the developers network that gives you an overview of data-driven unit tests, really kind of gives you a rounded out way of doing this an explanation. But really, it talks about how a data-driven unit test is a test that runs repeatedly for each row in a data source. It gives us a common scenario.
In that scenario we might have multiple input values that we want to use to test. An API, a method or whatever it is that we want to test. Instead of writing multiple unit tests that all call that thing and we have all of these unit tests. We could create one test that reads lines from our file or data source, whatever it is, and then runs those tests accordingly.
Now in order to use these, we have to set up our test class in a very kind of different way than we’ve looked at how to do it. TestContext since it itself is a class, we would need to create a property. We could have our public property and a private variable that’s just good programming standard, you don’t have to, but we would want to set them up this way.
Then using that ClassInitialize, we would want to set up a method that basically works a little bit like a constructor. When these test classes run, they’re going to look for a ClassInitialize and if there is one, then it’s going to run this before it gets into any other steps.
We’re going to set up our tests with our test context and pass it into that private variable. We’re also going to initialize our tests and TestInitialize. It’s something that we can use when we have kind of some prerequisites or things we want to do before we set up a test. All I’m doing here is writing out some information about the test.
We could just put an assertion in our test method here, and actually, just see what that looks like so that we can see all of this output. Of course if we Assert.IsTrue and put true in there, it’s always going to pass.
But, we can see what it gets us is TextContext.TestName is TestMethod1 and then, our static_testContext.TestName is also TestMethod1. This is just more like a kind of a “hello world” way of seeing if you’ve got everything set up, so that it’s initializing everything appropriately.
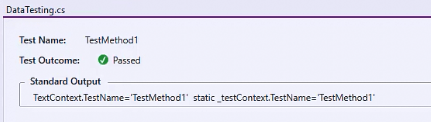
ClassInitialize is going to run at the beginning. Then, any further runs that would happen, our TestInitialized would happen. Then, our test method would happen but this is only going to happen that first time through.
Then I added into our initialize, there’s a couple of other properties that we can use here with our TestContext. Sometimes we want to know the deployment directory, the logs directory, and then, the name of the test.
So you can run this test and have this information printed out, so that you can verify that things are the way that they’re going.
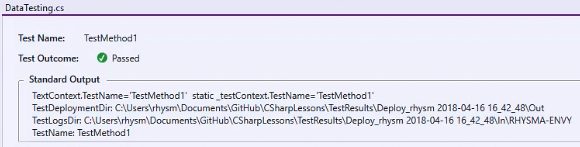
So, we can see where it’s putting this information or where it’s looking for test information.
In the next couple of sections we’ll look at how we can use our new TestContext class that we’ve set up here to actually do some data-driven testing.
Data Driven Testing with CSV Files
What we’re going to do now is set up a comma-separated value or CSV file that we can use to drive our testing.
I created a data folder here inside of my section for our solution. I’m going to right click on that, I’m going to Add a new item and in the new item window here.
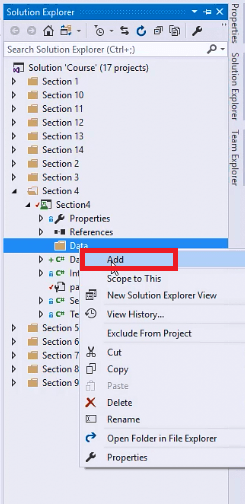
I should be able to find where it says Text File. And, we’re going to name that data.csv, click Add.

Then that will add it over here in our solution. You can see a little office thing here.
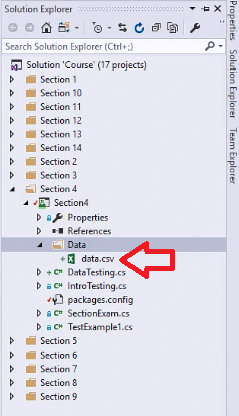
Then it goes ahead and sets us up in the editor. Let’s put in some values.
Here you can see that my first row that I pasted in here. Our column headings: Value1, Value2, an ExpectedMinValue and a Message. Then you can see each row here represents a test, so Value1, Value2, ExpectedMinValue and the Message, all comma separated. One test on each line, making sure that we’ve separated them out.
Now, when you’re doing this, you have to be very careful to not get the wrong encoding on your CSV file. Or, otherwise, they’ll add a bunch of junk characters that it won’t be able to read correctly. If we come up to File and we can Save As.
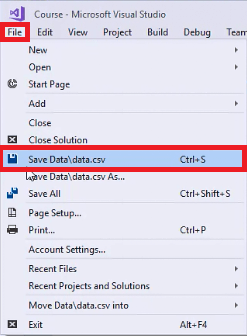
Then over here, on the Save, you’ll notice there’s a little error arrow here. We want to Save with Encoding.

Then it’ll say that it already exists. “Do we want to save it like this?”. Yes, we do.
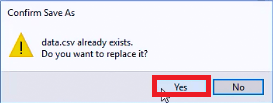
So, the proper encoding is Unicode( UTF-8 without signature). You’ll notice that with signature is usually the default, you’ll probably have to go all the way to the bottom because it starts with “u”. So, (UTF-8 without signature) – Codepage 65001. All right, that’s the important part here. Then we can click “Ok”. It will save it into our solution folder for us.
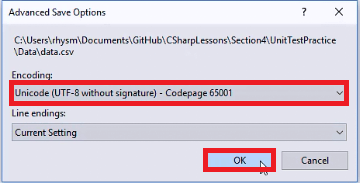
Now, one of the other things that we sometimes run into problems with is that the solution or your project file needs to be told that the CSV file needs to be copied on build.
Over in your solution, you’ll want to right-click on the CSV file and choose Properties.
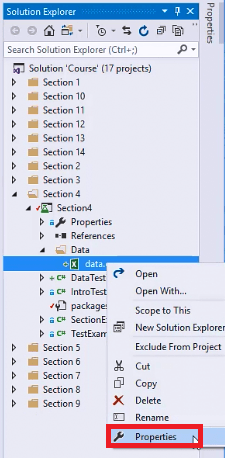
Then where it says Copy to Output Directory, Do not copy. So, we want to choose Copy if newer.
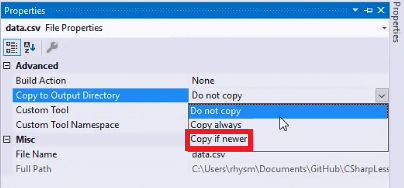
That way if we make any changes to this, then Visual Studio will go ahead and update the source file for us. We don’t have to worry about it not being there later. You don’t have to hit save or anything, it’ll just do it on its own.
Ok! Let’s look at the test method.
What do we have to do with our test method. Here I am in the test class, setting up our test method. Here you can see we have a data source attribute. There’s a couple of different things that have to go inside of here.
First off, we have to tell it that we’re using the test tools and that we’re going to use a CSV data source. Then, we have to tell it where can it find it, in the data folder and I named it data.csv. Then, we have to tell it the type of file, we have to tell it how we want it to access it. We want it to access it sequentially.
Here is my method and I can use that TestContext class object to call the DataRow. It’s going to get that information out of my data file. It’s going to be able to look at this information and plug it into these a and b variables.
So, DataRow item 0, I should get the first position. Item 1, I get the second position, so on and so forth. Then the expected and the message go into the proper variables. I’m doing a Math.Min and then we can assert.
We could debug this and actually see what it looks like. As we move into this first part, we can see that it gets our 1. Let’s go back and look, we should have 1, 10. 1 is the expected value and then it says “1 is less than 10”.
So, a gets the value of 1, b gets the value of 10. The expected is 1. And, there’s our string message. I need to fix the space in there, but it is “1 is less than 10”. Then, it runs the Math.Minand we get the actual. Then it runs our assertion, then it comes back and tells us whether or not the test is right.
Now, you noticed how this is a little different. It popped right back up to the top and started testing the next row. You can see that we got 192 which is the first value. So, it’ll keep doing this and run all of your tests for all of them that are in the file.
Then, you’ll be able to see as you scroll through here, which ones passed. You can see all of these have passed. And, which ones did not.
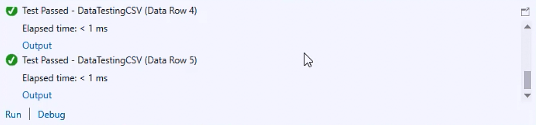
I’m sure you can see that this is a really economical way to run a bunch of different scenarios through the same test method. When you have that kind of scenario, where you want to test a bunch of values against the code that you’ve written.
TestCategory Attribute
Now that we’ve dug in a little bit more to testing. Let’s talk about how to run groups of tests and use the test category that we can use to group together tests that might have similar traits, or maybe, tests that are run on a certain schedule.
[TestCategory()] let us run groups of tests based on those assigned categories. That way, we don’t have to have manual test lists, that we might run maybe nightly or weekly.
So, to set up one of these [TestCategory()] , we can see we have our test method and we can set up a test category.
In that test category, we might say that this is nightly. You can add multiple categories in here, if this was also nightly and we wanted to add on that this was also weekly, we could add that in as well.
As of right now, Visual Studio only supports running [TestCategory()] by using the command line. I’m showing you the documentation here as it will show you the steps. It’s going to be very specific based on the drive letter of your installation, the username of the logged in, user and things like that. Where you’ve stored your project, all that makes a difference.
But, you can see here the basic command that you would run using the test case filter. So, if I did put nightly, then that’s what we would get.

As of right now, you know, we’ve looked at that Test Explorer. There’s not a way to run our tests as a group. I’m also going to add this down here.
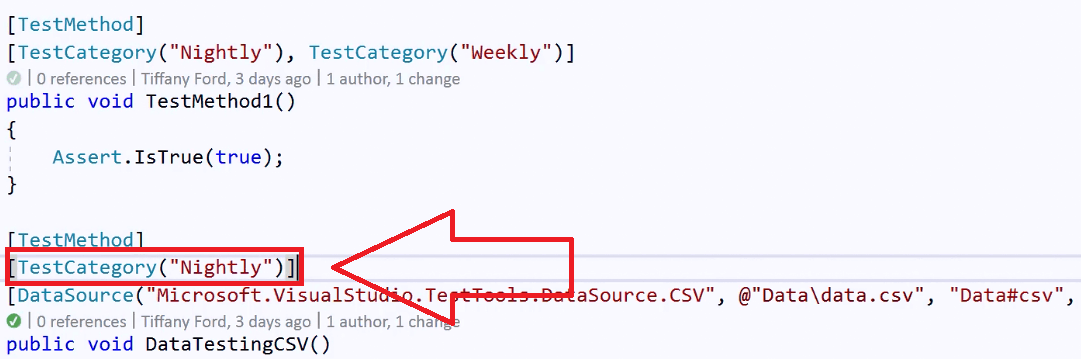
I’m going to open the Developer Command Prompt for VS 2017 and you’ll find this with the installation of your Visual Studio 2017 on your Start menu.
The first thing you’ll want to do is change the directory that you’re using to the one where your files are stored. If you’re not sure, you can always go into your project folder and you can come over to your Solution Explorer, right click on your project, and Open Folder in File Explorer. It’ll take you right in there.
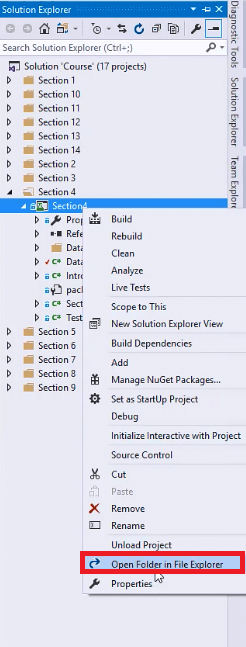
The key is we want to be exactly where the dll is, that’s always going to be in the bin, and then in the debug. See, there is that dll file.
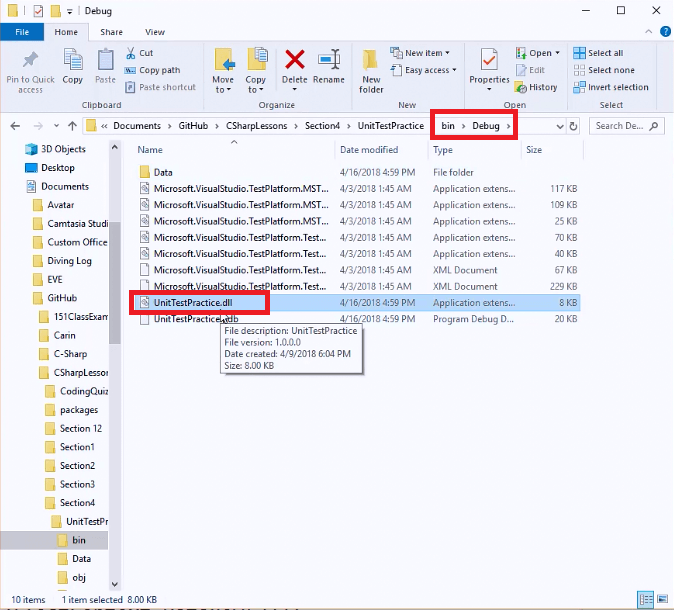
Once you have the directory changed to the right place, then you run the VsTest.console.exe. The name of your dll, if I go back to my project folder, I can see that it’s named unitTestPractice.dll. Then, our test case filter is for the test category to be nightly. You can see that it runs my tests, I get my output and it shows me that they passed. I get a little test run successful.
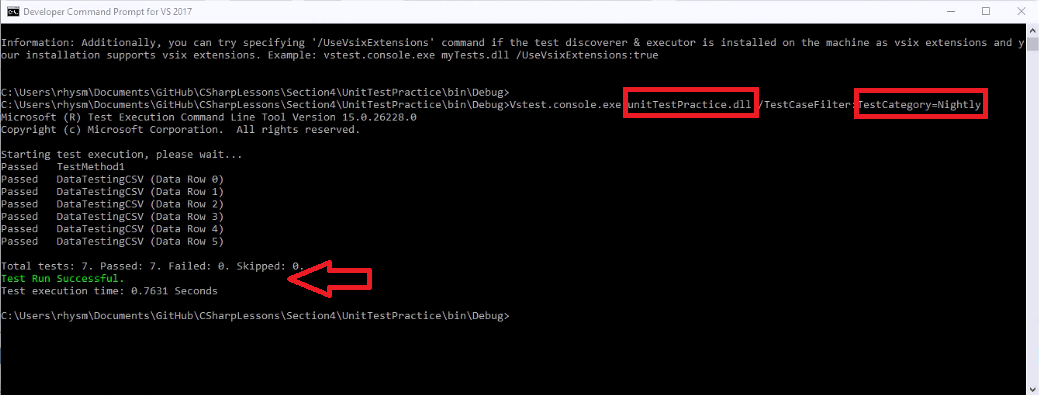
If these are something that we would want to run nightly, then we could have a PowerShell script or something set up in here, that runs these commands for us and gives us a log output. So, when we come in, in the morning, we would be able to review all of our test data and see what passed and what failed based on the nightly run.
When using those command line options, we looked at how we can use some of the filtering options. We can do it by category, we can specify particular settings. There’s a couple of different things that we can do in here to really get specific with the way we want our tests to be run.

Now, if you’ve never worked in the command line before, this can be a little intimidating to get started with. I would recommend that you definitely get some practice on this one. Try setting up some different categories, working with that command line, and get familiar with how we can go into our solution.
We can pick a project, we can open it in the file explorer. How do I find my dll and then how do I work with some of those different types of filters that are available to us in the command line.
Because you never know, in the future you might need to automate some of these tests yourself. Write these scripts, that command nightline knowledge. And, how to use that developer console will be very valuable.
Categorizing Tests
Let’s look at how we can use the Test Explorer window which we know to be over here on the left hand side that generally pops out and helps us with our testing information.I’m going to pin it down so it doesn’t go anywhere.
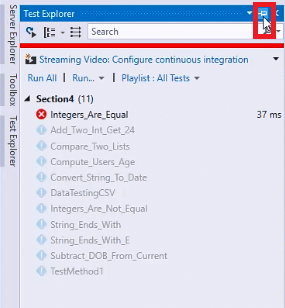
We’re going to look at how we can use Test Explorer to organize and group the different types of tests that we might be using inside of our solution.
The primary menu item we can see here is the Group By Namespace. When we click this menu, we can see some different items that we might want to group by.
![]()
We might want to group by class. Then, here you can see it’ll break us down into all of the tests by class. We can group by traits. If we’ve put traits on any of these tests, we can then group them here. We can see we have our nightly and weekly. Then a bunch of tests that don’t have any traits. Or, we can group them by project and have different ones inside of different projects.
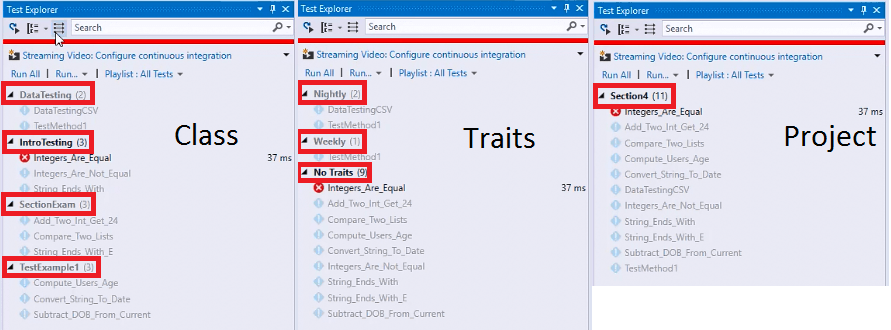
There are also some various tags and things that we can add into our tests, such as a description of the test. Here under the TestMethod, I could add in a Description and be able to put in a description of the test.
Once you’ve added something like a description into your TestMethod, if you come over here to our Test Explorer, and in this case I’ve got Traits set on, we can see that there is now a description over here.
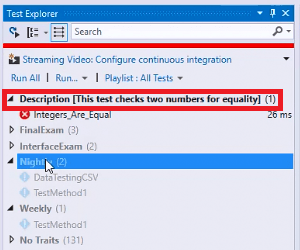
We can see that description set up inside of here. If we set up those [TestCategory()] inside of here, then we can also group by category and then maybe just run a particular category. I can run this group here, that’s under the Description.
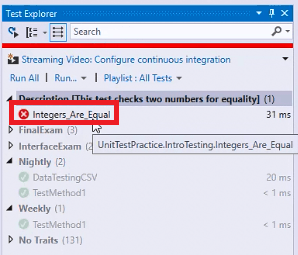
Or, like this group here that all can be found with this traded FinalExam. But, when I run this nightly group, it’ll also run this other traded group down here. That’s because they’ve got them set up in multiple groups.
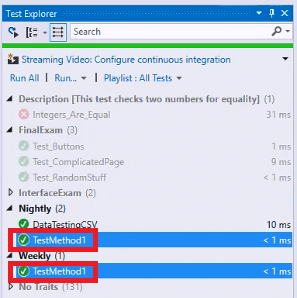
It’s something that you’ll want to pay attention to. If you’ve got multiple traits on a test, if that test is here, you can see when I click on it it’s trying to help us understand. If you have a test in more than one group, it’s going to run it no matter what.
It’s important to think about how you want to logically work with your different types of tests. Of course, some tests are set up to only be run under certain conditions, in certain scenarios. Or, maybe, on a nightly or weekly basis.
We want to think about how we can organize our tests, put descriptions on them which is especially helpful if it’s not maybe regularly apparent why a test needs to be run or, maybe, what that test is doing.
As you start building your own tests, start thinking about adding a description and maybe adding in some of these [TestCategory()], if it seems relevant to your design.
Math, Equality, and Relational Operators
Chapter 5
Math With Integers
We’re ready to start looking at how we do some math, quality and relational type operations with what we’ve learned about integers and with variables. In this section, we’re going to focus on doing math with integers.
I already have our project set up with a class named IntegerOperations set up as a [TestClass()].
I’ve set up some methods for each one of the operations that we’re going to look at in this section. We want to look at addition, subtraction, multiplication, division, and the modulus operator. In this section, we’re only to be working with integers. But, in later sections, we’re going to look at how to work with other data types.
I went ahead and set up two variables that will hold the integer values that we’ll be using throughout our test. Also, I’ve set up a ClassInitialize method.
The first thing that we’re going to want to do is “set the values of the two numbers we’ll be using”. I can set number1 to be a value and I can set number2 to be a value. If I want to change these values throughout my test, then I don’t have to do it in each one of the methods where I’m actually performing a test. It keeps everything kind of centralized and clean.
In our first one, we’ve looked at addition using integers a couple of times before, so maybe I want to set up a sum variable. I can take number1 and add it to number2.
Now, remember this ClassInitialize method is going to run before any other test methods that we were running. These values will be set, number1, number2, and then, we’ll be able to put those in the sum.
Now, if we want to set up some assertions, or, if we want to set up some WriteLine so that we can see what values we’re getting. We can do that in here. We’ll look at what we actually get before we run in the assertions on this test.
Let’s go ahead, give this a build and run this test. See what we’re actually getting as output, so we can be sure that this is running the way that we want. All right!
If we come into the output, we should see 15 because that’s 5 plus 10.

I could even write an Assert to check if sum is 15, that way I know whether or not this test is going to come out correct.
Subtraction looks very much the same, we can take number1 minus number2. I’m not going to write this one out but I’m going to go ahead and put in our Assert.AreEqualhere for the difference. Because I’m fairly certain that when you take 10 minus 5 you get 5.
But, we could go ahead and run this and make sure that we are in fact getting what we think we should be getting.
For multiplication, we use the asterisk, that’s the “Shift + 8”. We can take number1 multiplied by number2. Put in our Assert.AreEqual that 10 times 5 should be 50. All right! All good there!
For division, we use the slash. So, number1 divided by, that’s the forward slash, the one that’s shares the key usually with the question mark, you can see that when you take 10 and you divide it by 5 you get 2. That’s a good test.
Now the modulus operator is a little different than the ones that maybe you’ve seen previously. The modulus is basically the remainder of a division operation. Where you take number1 and you divide it by number2. If there’s any remainder left over, because they don’t divide evenly, that number is usually drop in favor of keeping the quotient, but the modulus gives us the remainder.
The modulus operator is the percent that shares the 5 key, if we take number1 modulus number2 in the case of an even division between ten and five, I’m actually going to get a modulus of zero.
This is a good way to be able to tell if a number divides evenly into another number, by using the modulus operator. Because if we get a remainder of zero, then we know it was a clean divide. Whereas if we had any remainder over, we would have that value instead.
This has been just a quick overview of the mathematical operations that we can do and how we can check for our values to make sure that we are in fact getting the sum, the difference, the product, etc, of our integer math operations.
Math with Floating Point Numbers
Next, we’re going to talk about doing math with floating-point data types. Not just whole number integers, but we have a couple of different types in the .NET framework that we can use for decimal values.
Here’s a table from our MSDN documentation.
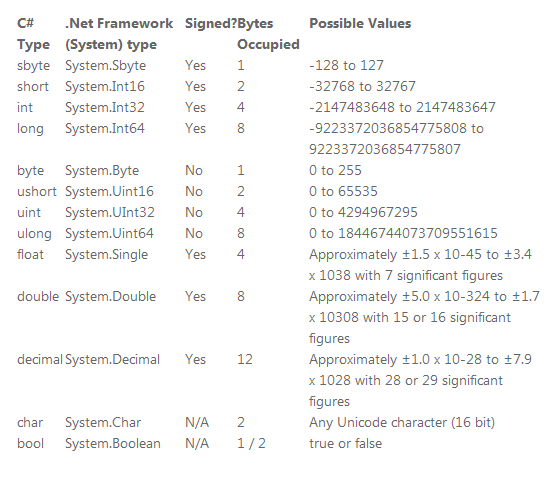
One of the things that we want to look at, we want to look at double, we want to look at float, we can look in here at kind of the differences and the significant figures, things between the two. Precision ultimately is the main difference.
Float is a single precision 32-bit floating-point data type and double is a double precision for 64-bit floating-point data type. It really just depends on what kind of significant figures you think you’re going to have. Now, these are both very different from decimal which we’ll look at in the next section.
They kind of act the same in terms of what we’re going to be looking at in our project. We had our integer operations in the last section, now we’re going to be looking at floating-point operations.
I set up a new TestClass and I went ahead and set up the two double variables. I gave them some floating-point values for the two numbers so we can look at mathematical operations with these types of variables.
Starting with a test of addition, you’ll notice we had to create our sum as a double as well. Since we have to always make sure that data types match across an expression. If number1 is a double and number2 is a double, then our outcome has to be a double as well.
I’ve changed our assertion for this sum to reflect 10.5 plus 5.0, which should be 15.5. One of the things that we have to keep in mind when we’re testing these kinds of variables is that we do get this decimal value at the end. We aren’t working with whole numbers.
For subtraction, again, making sure that we’re putting that double in using the subtraction operator. We need to update our value here so 10.5 minus 5.0 is going to actually give us 5.5. Right? We can run that test and see: is our hypothesis correct?
Multiplication, since we’re working with 10.5 this is actually going to give us 52.5. Same thing using that multiplication operator that we learned about.
Now division is where things get a little hairy with floating point numbers. When we have a floating point value with a decimal, if you are doing any kind of division, you run the risk of actually dropping off numbers from your precision. It won’t round, it will just truncate. Which means it chops the numbers off of the end. It is something we have to be careful about when we’re doing division operations with floating point numbers as opposed to whole numbers.
We sometimes expect a rounding when in fact it’s just going to lop them off the end. In this case believe we’re going to get 2.1, but we can test. That is in fact what we get.
With our remainder operation, with this modulus, sometimes we get some different behavior with floating point numbers as well. I went ahead and ran this so that it would fail. You could kind of see what the expected output is here. We have an assertion that the remainder is going to be zero, but that’s not true. We can see that the compiler says that this should actually be 0.5. With our quotient when we took 10.5 and we divided it by 5, we got a 2.1 quotient in our division operation. But when we took number1, 10.5 modulus 5, we ended up with a remainder of 0.5.
As you can see floating-point numbers can get kind of tricky when you’re doing these kinds of operations. You just need to pay attention to those decimal point values making sure that you remember it’s going to truncate and not round, understanding some of the kind of the differences in between, why should I use a float versus why should I use a double.
Sometimes we just don’t need to use that much memory and a floating-point number would be just as good as a double when we’re only working with 32-bit values.
In the next section, we’re going to look at decimals which are a little bit different due to their precision.
Math With Decimals
Next, we’re going to talk about decimal values.
Decimal values are a little different from what we looked at previously with float and double. We’ve talked about how float are 32-bit, seven digits of precision. Double are 64-bit, we get 15 or 16 digits of precision.
Decimals are huge. They’re 128 bit, we get up to 29 significant digits in precision. By far, floats and doubles are great when we need to store a value as a floating decimal point type. But, decimals, since they have a much higher precision, are usually used with any monetary or financial applications that would require a higher degree of accuracy.
In performance, decimals are super slow compared to doubles and floats. We don’t want that always everything looks like a nail when all you have is a hammer. Since the decimal can 100% accurately represent any number within the precision of the decimal format, you always want to use it where you have this idea of I need the most precision possible. Which is typically like monetary or scientific type pursuits.
I’ve added a new TestClass to our solution. We’re now working on DecimalOperations. I’ve changed our two variables here.
You can see one of the first things that makes a decimal very different from a float or a double is that just because we’ve set this to decimal, doesn’t mean we can then assign it kind of this floating point value in order for the compiler to tell the difference between this being like a double or a float and a decimal. We have to put an “M” behind it, like this. That is what tells the compiler “Hey, I want to use a decimal value instead of a double or a float”, which is the way we were able to write it earlier.
Now, I’ve set all of our tests up similar to the ones that we looked at in our previous example. Changing the datatype of what we’re expecting to be decimal instead of double. But, we’re doing all the same operations, we’re doing all the same assertions. Except when I run these tests they all fail.
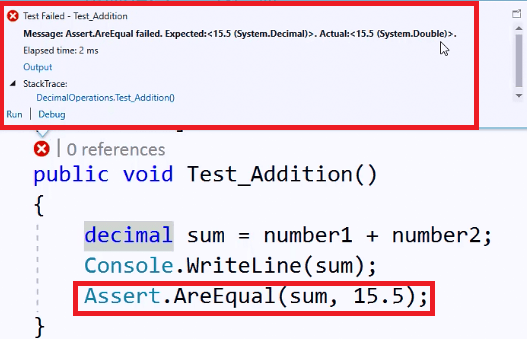
We can see in here that the message actually has to do what I was just talking about with that literal decimal M. It says it expected 15.5 as a system decimal, but we got a 15.5 or we were looking for a 15.5 double.
We have to actually specify that M value in here, as well, in order for the compiler to understand that that assertion is correct. Now you can see these tests pass.
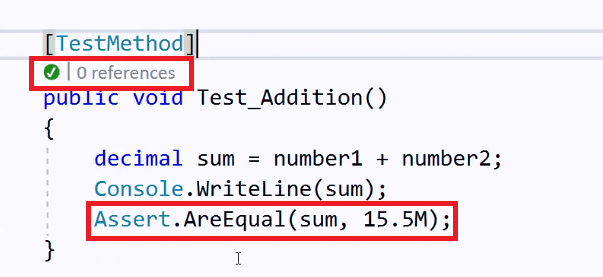
For all of these values, you would need to come in and anytime that you’re using a decimal value whether you’re literally assigning that value or you’re doing what we’re doing here with these assertions. We need to put that literal M in there, so that the compiler understands that that’s what we want, that we’re looking for a decimal value.
Now you can see all of our tests pass.
As you can see outcome wise, the value didn’t change. We add them together, we still get 15.5. We subtract them, we still get 5.5. We divide them, we still get 2.1.
It’s just the way that the compiler holds the information in memory and the way that the compiler needs to differentiate between floating-point values that inherently look the same when we write them but are stored differently and treated differently by our compiler.
You’ll want to keep that in mind, anytime you get that funky error that looks like this.

When we put our mouse over it, it says “Literal of type double cannot be implicitly converted to type ‘decimal’; use an ‘M’ suffix to create a literal of this type”
That’s what it wants you to do, is put that “M” in there.
Keep that in mind if you are using any decimal values in the future. If you see that error that this is what it’s talking about.
Equality And Relationship Operators
We’re ready to start talking about one of the fundamental concepts in programming which is being able to test for equality and being able to test for a relationship or a relational nature of two variables.
In C# we have two equality operators. When we want to test if things “are equal”, we use a double equal sign (==). We can say something like X is equal to Y, this would return a true or false value based on the values of x and y. By default, for any reference types other than strings, this is going to work.
We don’t want to confuse the double equal sign with the single equal sign (=) which is an assignment. If i say x equals y, then I’m saying put the value of y in x. If I say x double equals y, I’m testing for equality. Don’t get those two confused.
Our other operator that we have in equality is the “not equal”. Exclamation equals(!=) is “not equal”. When we want to test for two values, I could ask is X not equal to Y. This is going to give me a true or false value based on the values of x and y.
Any time that we’re wanting to test for this idea of equality, we can use any of these two, “are equal” or “not equal” to type operators.
We also have a variety of relational operators that we can use when we want to test values and find out maybe if they’re greater than, less than or what’s their relationship to each other.
We have all of the standard mathematical ones that you may or may not be familiar with. But things like “less than” (<”), “greater than” (>), “less than or equal to” (<=), “greater than or equal to” (>=). And then, we also have “is” which allows us to check for type compatibility. We have “as” which allows us to do type conversion.
So, “is” will give us a true if our left operand can be cast into a specified type on the right. And, “as” returns the left operand cast as the type specified on the right.
These won’t make too much sense until we start getting into classes and such. But similar to our equality operators that we looked at, we can ask “is X less than Y?”. And, we’ll get a true or false response. Or, “is X greater than or equal to Y?”. These are all going to return a true or false response, because ultimately that’s what we’re looking for. Allowing us to create these conditional expressions.
Adding to this idea on relationships, we can also be able to start to ask more complex compound questions and create more compound expressions with operators for “and” and “or”. When we want to write “and”, we use a double ampersand (&&). We can say “x && y”. The “or” is done with the two pipe signs (||). This is the key that shares the backslash, right above your Enter key. So two up and down pipes so we could say “x||y”.
Now, when we’re using these kinds of statements, we generally have to link them back to one of these relational operators that we’ve been looking at. I could say “x|| y > z”. This is going to give me again that true or false response that I’m looking for so that I can evaluate that condition.
Ultimately what we want to do is say, if it’s true then do something and if it’s false do something. Creating these two entirely different paths of logical control in our application. Let’s start practicing this in the code in the next section.
Equality and Relational Operators
| Symbol | Relational/Equality Operators |
|---|---|
| == | Are Equal |
| != | Are Not Equal |
| < | Less Than |
| > | Greater Than |
| <= | Less Than or Equal To |
| >= | Greater Than or Equal to |
| is | Type Compatibility |
| as | Type Conversion |
| || | Or |
| && | And |
If Statements
Now that you understand a little bit about these relational operators and some of the things that we can do to compare or evaluate the variables that we’re using, I’ve set up a new TestClass for us to look at the quality and relationship things that we’re looking at.
I have two variables of type int and I’ve set up our initialization to give those some values. What we’re going to do is go through and write some TestMethod that allow us to exercise some of these equality and relationship operators we just talked about.
The first test we’re going to write is Number1_Is_Equal_Number2(). I’m going to introduce you to again one of those fundamental things that we have in C# or in most programming languages which is the if() statement.
The if() statement allows us to set up a conditional that is going to evaluate to a true or false value. If we want to know if number1==number2. If that’s true, then this code block will execute.
In an if() statement, this code only executes if the conditional is true. If it’s not true, then it’s not going to execute. We can write if() statements like this so that we can do something if this is true.
We could also set up an assertion that checks for this. We can Assert.IsTrue() on the conditional that we’re testing, we don’t have to do this inside of the if() statement. I’m just putting it in here.
If we wanted to test Assert.IsTrue, this is going to test this condition. The test will not pass if these are not equal. In this case they’re not going to be equal, we have number1 is 10 and number2 is 5. We know this test is doomed to fail.
You could also set up a separate assert, Assert.IsFalse. And, do the same thing, put your conditional in there. Now, this is one of the times, and I’ve told you again that you shouldn’t have more than one assertion per TestMethod, but in this case this code only executes if this is true.
If this is false, then it’s going to go ahead and come down and do this assertion here, Assert.IsFalse.
We get a pass because Assert.Is.False. So, it depends on what you want to test for here. If you’re actually wanting to test if these are in fact equal, you could pull all of this code out of here and just do your Assert.IsTrue.
If you’re truly wanting to know if they’re equal, then this test is not going to pass unless we change these two values.
Down here under Number1_Is_Not_Equal_Number2(). We have a similar scenario, but since our numbers currently don’t match, we should actually get a good check out of this one. So, number1 != number2. We can Assert.IsTrue. We get a good check.
Likewise, we can take this same test to Number1_Greater_Than_Number2(). Change our conditional to the “greater than” sign (>) to be able to check if that’s true. Since number1 is 10 and number2 is five, this test does pass.
Likewise we could do something similar here for Number1_Greater_Than_Or_Equal_Number2(). Which should be basically the same test, but if our two numbers were the same then it would still give us a pass. Whereas, for example, if both numbers are 10, then number1 is not greater than number2. This would fail. But this one would still pass because number1 would be equal to number2. That’s just kind of the difference between >and >=.
Our next two tests are going to be looking for a “less than”. Our test won’t pass here because number1 is 10 and number2 is 5. I move this assertion out here, so you can see that. But we could dig into the Test Explorer to see what is it actually telling us. We’re just seeing that Assert.IsTrue has failed. Because remember, we’re just evaluating the conditional here.
Likewise, if we just wanted to do an Assert.IsTrue on the TestMethod, Number1_Less_Than_Or_Equal_Number2(). We can see that it is not.
You can play around with these tests based on the values that you give these two integers to change the outcomes.
Ultimately, I wanted you to see how the if() statement should work, or how we should write these kind of conditionals that we want to evaluate when we’re trying to get this boolean true or false response.
In the next section we’re going to continue to look at this if() statement with the else statement which adds another layer to this.
If Else Statements
Picking up where we left off, talking about the if() statement. When we have kind of this binary or boolean relationship, where something could be true or could be false.
We’ve seen how we can create this if() statement with a conditional inside and if that’s true then the code block in here will execute. If it’s false, it will not.
Well, we also have the else block. Which is code that will execute if the if() statement is false. This code is executed if the if() statement is true. This code in the else block is executed if the statement is false.
If we are looking for a test that truly tells us that this is true. We can Assert.IsTrue here, we can Assert.IsFalse here, or we could also just Assert.Fail depending on how you wanted to do this.
When we test if Number1_Is_Equal_Number2, we’ll get a green check because this assertion is going to come out to pass. We get a fail because it doesn’t. We can look at that in the Test Explorer. See that we’re just getting an Assert.Fail.
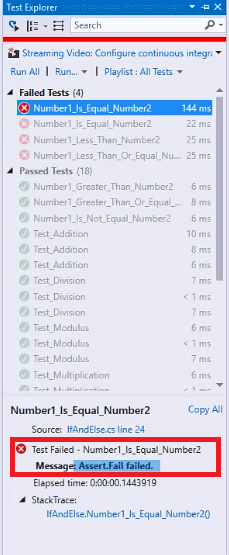
That gives us greater flexibility with determining the outcome of our tests. Creating this two paths of execution, sometimes we want to do something if a value is is equal to another, if it’s greater than another. If we have this conditional that we have evaluated and it’s true, then we want to do something. If it’s false, then we want to do something else. We want to give maybe a message to the user, we want to do something else with our code execution. That’s what the if(), else statement is for.
We can come through here, set up in our tests. If that’s true, then we’ll get a green check and otherwise it will fail. Likewise, down here. We can run these tests. I just went ahead and set them all up at this point so we could run them and see the outcome.
Looking at our tests, for number1 <= number2, we get a fail. For number1 < number2, we get a fail. For number1 >= number2, we get a pass. Or for, number1 > number2, we get a pass. For number1 != number2, we get a pass. Then, therefore, for number1 == number2, we get a fail here.
Allowing your tests or even in your code, when you’re wanting to create this kind of decision branching inside of your code, the if(), else statement.
As you saw, the if() statement can stand alone when we just have code we want to execute.
If that’s true, if it’s not true, it’ll just jump right over it and continue execution of the next portion of your code. But, if we do have something we want to do if it’s false. Then, we can add that else block in there.
Now we don’t always have to Assert.Fail in the case of an else. Maybe we want to do a different type of assertion. I was just showing you that if this is true, then we get a good check. If it’s not, then we don’t.
I do also want to point out that we can nest if() statements inside of other if() statements. If this is true and we want to come in here and ask another if() statement question, maybe, if number1 >= number2, we then want to come in here and ask “is it equal?”. This code down here, that’s part of this original if() block, this will still execute if this is true.
If this is true, it’s going to come in and ask this second question. If this question is true, it will do this block. But, because the first one was true and it’s part of this section in here, it’s going to do this code as well.
Just because this one isn’t true, doesn’t mean it will hop down to this else. But, this block could also have its own else block.
We can continue to nest these statements inside of each other as deep as we need to go to create this kind of follow up question line of logic where we are branching our decisions through our code and setting up whatever scenario we need to make sure that the program is doing what it’s supposed to be doing.
Your turn…
What was your favorite section of this blog post? Do you have any questions that weren’t covered? Leave your comment below…